Actifsource
![]()
![]()
This is the actifsource documentation
![]()
![]()
This is the actifsource documentation
![]()
![]()
| Manual | Actifsource User Manual |
|---|---|
| Notation | ↪ To do ⓘ Information • Bold: Terms from actifsource or other technologies and tools • Bold underlined: actifsource Resources • Monospaced: User input• Italics: Important terms in current situation |
| Disclaimer | The authors do not accept any liability arising out of the application or use of any information or equipment described herein. The information contained within this document is by its very nature incomplete. Therefore the authors accept no responsibility for the precise accuracy of the documentation contained herein. It should be used rather as a guide and starting point. |
| Contact | Actifsource AG Täfernstrasse 37 5405 Baden-Dättwil Switzerland www.actifsource.com |
| Trademark | Actifsource is a registered trademark of Actifsource AG in Switzerland, the EU, USA, and China. other names appearing on the site may be trademarks of their respective owners. |

Actifsource is a comprehensive design and code generator tool, covering all aspects of domain-driven software development from domain analysis through to the design models, code generating, testing, refactoring and maintenance.
Actifsource allows you to define your domain-specific software specification.

This software specification is also called domain model, or specific model. The domain model shall be independent from any used technology (i.e. programming language, operating system, etc.).

As the domain model is domain-specific by definition, we need to specify the structure for every domain. This task is done in the so called meta-model.

The meta-model is built upon concepts of the Actifsource core model (aka Meta Meta-Model). Note that the core model is self-describing, i.e., it is the meta-model of itself.

To find an adequate meta-model, you need to analyze your business domain. If you like to create a Service Oriented Architecture (SAO), your meta-model might will contain services. If you like to model state machines, your meta-model will define states, event and transitions.
Note that the Meta-Model is an abstraction of your business domain, and defines the business classes and their relationships.
As we do not know your meta-model in advance, we cannot generate any suitable code for you. This means, that you have to define your own code templates according to the meta-model. Defining code templates is as easy as writing normal code.

Since everything depends on the meta-model you have to start by analyzing your business domain. Once the meta-model is defined, you are able to enter you domain specific software specification accordingly. Also template code is written along the meta-model. From this three models (meta-model, domain model, code template) your code is generated by the Actifsource code generator.

Every model consists of so called resources. A resource is like an object and the most abstract entity from the Actifsource core model. In fact, every model element is a resource.
Every resource is identified by a globally unique identifier (GUID) which is automatically assigned, if you create a new resource. Therefore changing resource names never affects any relation between resources.
To get started with Actifsource, we suggest our tutorials on the Actifsource web site. Please visit www.actifsource.com/tutorials.

Actifsource is shipped as Eclipse Plugin. Please make sure to install Eclipse first. Choose Help/Install new Software… to install Actifsource from one of the following Eclipse Update Sites:
If you are not familiar with the Eclipse environment, please consult the Installing Actifsource.
The Actifsource technology allows you to track any keystroke in real-time. As a result of this feature the memory consumption might be quite high for larger models. Make sure to adopt the memory given to Eclipse if necessary in the eclipse.ini file in the Eclipse directory. We suggest at least 4 GB of ram.

To observe the memory while working with Actifsource enable Window/Preferences/General/Show heap status.

Make sure to enable Show Max Heap to track the maximum memory usage by using the context menu on the heap status display.

Since Eclipse is a general software development tool, you must be able to select different perspectives. Make sure that the Actifsource Perspective is selected when working with Actifsource.

The preferences dialog (Window/Preferences/Actifsource) provides the following configuration options.
Selecting the Actifsource menu shows a statistic of the resources.


The style configuration let you define your own colors.


The project wizard allows you to create a new Actifsource project from scratch. Select File/new/Actifsource Project.


All Actifsource resources are saved in Resource Files with the ending
.asr in an xml format. The resource path defines where to find the
model resources.
Generated code is written to target folders. You might specify any existing or new folder in your project as a target folder.

Add Target Folder… Adds a new target folder to your project.
Add Build Config Adds a new build configuration to your target folder.
A build configuration is kind of a make file that tells actifsource which templates to build. If no build configuration is defined, Actifsource automatically generates code for all templates from the current project, combined with all matching resources from the current project (see Build Config, see Template Editor).
Add Package… Adds a new package to your build configuration. Code is only generated for matching resources found in the specified packages.
com.actifsource.statemachine.specific.* (all resources in the package)com.actifsource.statemachine.specific.** (all resources in the package and its subpackages)If no package is defined, Actifsource generates code for all matching resources found in all packages of the current project.
Note that you need to reference packages from other projects explicitly. Set the project dependencies first accordingly.
Note that you need to reference resources from other project explicitly. Set the project dependencies first (see Chapter 2.5.5 Project Dependencies).

This feature is for beta users and developers only and might be used to reference folders for templates of third party products.

Use the project dependencies if you like to split your model in different Actifsource projects. Note that you have to set the project dependencies, before you might reference packages and resources from other projects in the target folder.

Use the built-in dependencies to reference any Actifsource built-in models.
| Built-In | Description |
|---|---|
| CORE | The Actifsource core model (do not remove) |
| DIAGRAM | Domain Diagram |
| CIP | Embedded real-time state engine |
| DEC | Modelling I/O connection and scheduling for embedded systems |
| OCUMENTATION_METAMODEL | Creates meta-model documentation from class diagrams |
| JAVAMODEL | Creates Java classes for model access (shipped with Core built-in) |
| GRAPHVIZ | Generator for graphviz |
| WORKSPACE | File/folder operations and generating Eclipse projects |
| DATATYPE | Common data type meta-model |
| UML UML | state engine and code generator |
| ECORE | ECore meta-model |
| MODVIS | Visualization and animation of domain diagrams in the web browser |
| FREEMARKER | Generator for freemarker templates |
| XPAND | Generator for xpand templates |
All settings shown in Chapter 2.5 Project Wizard can be found in Project/Properties/Actifsource.

We suggest the following package structure.

Use the project menu to control the build system of Eclipse and Actifsource.

Build Automatically If Build Automatically is switched on, Eclipse will build the project automatically after changed files have been saved.
Actifsource also generates Java classes for internal use. Generating these internal classes is also switched off by Build Automatically and you can’t expect Actifsource to work correctly. Therefore, please make sure that Build Automatically is switched on.
Please make yourself familiar with the Eclipse Builder concept. See Project/Properties/Builders to see the active builders for your project and their execution order (see Chapter 7.7 Eclipse Builder).

Generate Automatically If Generate Automatically is switched on, Actifsource will generate code after saving changed files. If Generate Automically is not switched on, you have to trigger code generation manually (Right-click on the Eclipse project and select Generate Code).
Actifsource also generates Java classes for internal use. Generating these internal classes is not switched off by Generate Automatically.
Enable External Builder This feature is for beta users and developers only. Since Actifsource is developed by Actifsource, we must be able to build ourselves with the current version. The external builder is compiled at development time and ensures that every change in the Actifsource workspace affects the next code generation run.
The Actifsource toolbar provides you with two important tools.
New Actifsource Resource
 The new resource tool lets you create a new Actifsource resource in the selected package. The new resource tool only allows creating so called root classes.
Open Actifsource Resource
 This tool shows all resources and allows filtering by name. Please note that this operation might be slow for a large amount of resources.
The project explorer let you access your resource files. Resources are stored as xml files and named by the GUID (Globally Unique Identifier) of the resource. Since this format is incomprehensible for humans, the Project Explorer shows the name for named resources.

Switch on the option Link with Editor to synchronize the project explorer with the currently active editor.
Actifsource allows you to show aggregated resources sorted by relation or just by their occurrence in the containing class.
Group Aggregation By Relation switched on

Group Aggregation By Relation switched off


Flat Package Presentation Using the flat package presentation, all packages are shown as a flat list.

Hierarchical Package Presentation Using the hierarchical package presentation, the hierarchy is preserved. Note that folders which do not contain files are shown flat anyhow. This might lead to problems if you like to add new files or folders in a collapsed package. Just switch to the flat package presentation to solve this problem.

Use drag and drop to move resources between packages. All references to the resource are kept automatically.

The context menu of the project explorer supports several important operations on packages and resources.
The new/Actifsource dialog creates different types of actifsource files. For some types of resources, you can create new resources based on existing resources.
The Open with dialog forces eclipse to open files with a specific editor. The first element in the Open With list is the default editor. Once opened with another than the default editor Eclipse reminds this setting when double clicking the file to open. Just select Open With/Default Editor to restore the settings.

Actifsource supports the following editor types:

You may rename any resource or package via the context menu/rename or by pressing F2 (Windows).
If you change your meta-model, any depending domain model might become invalid. Actifsource lets you register a piece of Java code, which transforms all existing domain models to fit the new meta-model.
Actifsource also uses this feature intensely if there are changes in the core model (meta meta-model). Please make sure to check the release notes to see if you need to run a Generic Refactoring after updating to a new Actifsource Version.


Working together in a team, you might have collisions when checking Actifsource resource files (.asr) into your version control system (i.e. CVS, SVN, GIT etc.).
Actifsource lets you compare resources and resolve conflicts in the compare view of the Resource Editor.
In the context menu of the selected resource you will find the following commands to show specific dependencies.
 Shows all instances of the selected resource. Note that a resource must be of type Class to have instances. See also Chapter 2.12.2.
 Shows all types of the selected resource (typeof statement). See also Chapter 2.12.2.
 Shows all sub classes of the selected resource (extend statement). Note that a resource must be of type Class to have sub classes. See also Chapter 2.12.2.
 Shows all super classes of the selected resource (extend statement). Note that a resource must be of type Class to have super classes. See also Chapter 2.12.2.
 Shows all resources that are referencing the selected resource. See also Chapter 2.12.6.
 Sorts resources referenced by a relation. Note that you can sort according to any literal attribute (i.e. name).

Note that you have to switch on Group Aggregation By Relation (see Chapter 2.10.2 Actifsource Presentation) to see the relations.

The Actifsource Query Language let you query the model.

Shows the hierarchy between resources.

Shows all model inconsistencies calculated by the validator. Make sure that this view is always visible to check whether your model is valid or not. Note that the code generator could throw an exception if your model is invalid.

The model navigator shows all resources sorted by projects, packages and types. Use the model navigator to find classes outside your project.

Shows all protected regions from a generated file. Click on the entry to navigate to the protected region in the selected file.

Shows all references to a specific resource in the form Subject-Predicate-Object while object is the referenced resource.
The Actifsource Resource Editor allows you to view and/or edit any Actifsource resource. Since everything is a resource in Actifsource this is the most important editor.
The Actifsource Resource Editor shows resources as tree (similar to the Windows Explorer).

Actifsource distinguish between aggregated and referenced resources. An aggregated resource lives in the context of the parent resource. Deleting the parent resource will delete all aggregated resources.
Referenced resource may live anywhere in the model and are just referenced. Delete the referencing class will not affect the lifetime of the referenced resource.
All information is grouped by properties (see also Chapter Property). Actifsource distinguish the following property types.

| Class | Meaning |
|---|---|
| Property | Base class for all properties |
| Relation | Base class for all relations |
| Composition | Leads to aggregated resources (UML: Aggregation, Composition) |
| UseRelation | Leads to referenced resources (UML: Association) |
| Attribute | Primitive literals (String, Boolean, Integer, etc.) |
To work with large resources efficiently, Actifsource can expand or collapse aggregated resources.

Use the following possibilities to expand/collapse resources.
| Device | Action |
|---|---|
| Mouse | Klick the [+] [-] sign\ DoubleClick the property |
| Context menu | Open/Close Folding |
| Keyboard | Enter (Open/Close Folding)\ Backspace (Close Folding) |
The typeOf statement of a resource shows the instantiation relation and declares the type of this resource.

Actifsource only allows a typeOf relation to resources of type Class.


Deploying Actifsource Models as an Eclipse Plugin (see Chapter 15 Plugin Project) leads to a read only view of the models. Models that are read-only are displayed in gray colors.
Note that the Actifsource Core Model is read-only for you.
The breadcrumb helps you navigating large resources.

Clicking on the arrow in the breadcrumb allows you navigating all resources from the same property.

Clicking on a resource in the breadcrumb allows you to focus only on this aggregated resource. Use this feature to work with large resource files.

Actifsource allows you to browse any resource in any editor.

To browse any resources in actifsource use the following possibilities.
| Device | Action |
|---|---|
| Mouse | Ctrl+LeftClick |
| Context menu | Browse Into |
| Keyboard | F3 |
Actifsource shows an empty line for all properties which might have another instance (depends on the subject cardinality; see Chapter 4.4.1 Property).

To insert a resources on the empty line use the following possibilities.
| Device | Action |
|---|---|
| Mouse | Ctrl+DoubleLeftClick on the property |
| Context menu | Insert here |
| Keyboard | Enter |
Actifsource allows inserting resources before or after existing properties.

To insert an aggregated resource before or after an existing resource use the following possibilities.
| Device | Action |
|---|---|
| Mouse | Ctrl+DoubleLeftClick to insert after the current resource\ Ctrl+Shift+DoubleLeftClick to before after the current resource |
| Context menu | Insert after to insert after the current resource\ Insert before to insert before the current resource |
| Keyboard | Ctrl+Enter to insert after the current resource\ Ctrl+Shift+Enter to insert before the current resource |

To reference any resource use the content assist.
| Device | Action |
|---|---|
| Context menu | Open Content Assist |
| Keyboard | Ctrl+Space |
You may also type some letters to filter the resources.
Note that Actifsource supports content assist in many different situations. Just try Ctrl+Space to activate content assist via keyboard

You are able to create new referenced resources just by typing the named and select new from the content assist.

The place where the resource is created depends on the UseRangeRestrictionAspect (see Chapter 4.4.4 UseRelation). If there is no UseRangeRestrictionAspect defined, the new resource is created in the same package as the referencing resource.
If you need to change the order you can simple move resources up and down within the same property.

To move resources up and down use the following possibilities.
| Device | Action |
|---|---|
| Context menu | Move Down\ Move Up |
| Keyboard | Alt+CursorDown\ Alt+CursorUp |
Actifsource lets you sort all resources of the same property by any literal (i.e. name property).

Note that Actifsource supports content assist in many different situations. Just try Ctrl+Space to activate content assist via keyboard
Sometimes Actifsource offers a quick assist to fix common issues. Hoover the mouse pointer over the light bulb symbol
 to get a tooltip with a short description of the problem.

Click on the bulb symbol to get the possible solutions.

| Device | Action |
|---|---|
| Mouse | Click on the bulb symbol |
| Keyboard | Ctrl+1 |
Every meta-model is based on the Actifsource Core Model. Make sure that you understand the concepts of Resource, Class and Property before you start creating your own meta-model.

In Actifsource everything is a Resource. That means that every Resource you create extends the Resource. Even Resource extends Resource, so that the core model can describe itself.

If the Resource shall has a name you can extend from NamedResource.

Creating your own meta-model you have to specify a set of classes and their relationships. The Core Model therefore provides you a NamedResource called Class. Class is the only Resource in Actifsource that can be instantiated where in this context we mean by instantiate that there is a typeOf relation. For that reason Resource is of type Class and Class extends NamedResource.
This recursive definition becomes necessary as the Actifsource core model has to describe itself. You can say that the Actifsource core model is meta-model of itself.

Any information is modelled by a property. Specifying your own class therefore also means specifying all properties of this class.

There are different types of properties.

The property acts as an abstract base class. Please note that properties are fully typed. In Actifsource the type of a property is named range.

Every resource that can be referenced by a range has to be of type AbstractType. One abstract type you already know by now is Class.

SubjectCardinality The Property defines the subject cardinality which determines how many resources of type B can be referenced by a resource of type A via relation b.

You may choose one of the following predefined cardinality instances.

It is also possible to define any other cardinality just by specifying minCardinality and maxCardinality.

Relation The relation acts as an abstract base class for any relation property between classes.
Extends The relation extends allows you to define sub-properties of existing properties in a super class.

ASub.bSub extends A.b in the following example. That means that instances of ASub can have only references to resources of type BSub while it is still possible to access the ASub.bSub resources via A.b as type of B

It is also possible to have more than one sub-property that extends the same super-property, as long as the sum of cardinalities of the sub-properties complies with the cardinality of the super-property.

Please note that is it only allowed to extend a property of the same type (i.e. UseRelation extends UseRelation, Composition extends Composition).
ObjectCardinality The Relation defines the object cardinality which determines how many resources of type A can reference a resource of type B via relation b

You may choose one of the following predefined cardinality instances.

The UseRelation (UML: Association) references another resource without affecting the lifetime of this resource. Deleting the referencing resource will not delete the referenced resource.

The range of UseRelation is AbstractType.


The Composition (UML: Aggregation, Composition) aggregates another resource. Deleting the aggregating resource of type A will delete the referenced resources of type B

Please note that you have to adjust the ObjectCardinality if B may be owned either from A1 or A2

The range of Composition is Class.

Combining two existing models together is a very important task. Sometimes this is done by so called model transformation. Actifsource chooses another way, because model transformation often only works in one direction. Actifsource allows decorating existing resources with other ones. That means that we can add any auxiliary information to already existing information. You will find out that this is a very powerful concept.
The DecoratingRelation allows building a homomorphism. A homomorphism is a structure-preserving map between two structures. The word homomorphism comes from the ancient Greek language: ὁμός (homos) meaning "same" and μορφή (morphe) meaning "shape".
Consider a resource A1 with a list b1 of resources of type B1 Consider a second List A2 that has a reference a1 to a resource of type A1 The decorating relation A2.b2 shall have 0..1 resources of type B2 for any resources reached via A2.a1.b1

The decorating relation A2.b2 needs a decorating aspect which defines where to find the resources that shall be decorated.

Let us create a resource TestA1 of type A1 first.

Now let us create a resource TestA2 of type A2 with a reference to TestA1 Please note that A2.b2 is now decorating A2.a1.b1 what is indicated by the brackets (i.e. b1[B1_1]).

Creating a decorated resource will automatically fill in the target property b1

Please note that the decorating relation needs a subclass of type Decorator.

If your decorating relation does not point to a resource which fits the requirements Actifsource comes up with a quick assist (see also Chapter 3.10 Quick Assist).

The quick assist extends the range of the decorating relation from Decorator and adds a sub relation to Decorator.target with type of the target of your decorating aspect.

[TBD]
The Attribute allows creating simple literals. There are some predefined literal instances that you might use. Please note that the range of an attribute is Literal where Literal is also an AbstractType as already seen for Class (see Chapter 4.4.1 Property).


As we have seen before, Class and Literal both extend AbstractType. Furthermore, AbstractLiteral is of type Literal and Resource is of type Class. To complete this picture, we can add Any which is of type AbstractType.
The Actifsource Core provides a set of resources that allows you to build your own meta-model. The most important resources are Class with its Properties and Enum.
ch.actifsource.core.Class

Note that the comment property is inherited by extending from Commentable. Extending from Commentable allows writing comment for any resource and activates the tooltip functionality.
Note that you might define a selector aspect pointing to a TemplateFunction (see Chapter 9.3.6 TemplateFunction) or a TemplateLineFunction (see Chapter 9.3.7 TemplateLineFunction).
| Modifier | Description |
|---|---|
| Abstract | No instance allowed of this class. |
| Final | No subclass allowed of this class. |
property Defines the property of this class. Properties carry the data when instantiating the class. Choose the property type you need (see also Chapter Property).

definesAspect Defines aspects for instances of this class (see also aspect[InitializationAspect], aspect[ResourceValidationAspect], aspect\NameAspect] which are defined in the aspect property of the class Class.
allowRoot A Class is a root class if it is not aggregated exclusively (that mean owned by an ownRelation with ObjectCardinality1_1). Set this flag to true or false if you want to overwrite the Actifsource logic.
Please note that only root classes can be created directly via the New Actifsource Resource Tool (see Chapter 2.9.1 New Actifsource Resource).
classIcon Sets an icon for this class and all instances. You can select an icon project by using content assist to browse the current project. The icon size shall be 16 x 16 pixels.
lineColor Deprecated.
fillColor Deprecated.
shape Deprecated.
ch.actifsource.core.EnumThe enum is a class with a set of values.

Note that you might define properties in your enum which are than accessible in the values.

Actifsource offers graphical editors to view and edit the meta-model and model. For editing the model it is possible to define domain-specific editors.
The class diagram editor allows you to create new meta-models based on Actifsource classes.
You can create a new class diagram via context menu in the project explorer or File/New.

Preselecting a package will directly fill in the resource path and package in the wizard.

Use the palette to edit your diagram.

Select Selects one or many classes from the diagram. Use Ctrl+Click for multi select.
Marquee Selects classes from the diagram within a rectangle.
Extension Derives a class from another class by adding a Class.extend statement in the sub class.

Inserting an extends-relation from MySubClass to MyClass would add an extends-relation from MySubClass to MyClass as expected. At the same time the extends-relation from MySubSubClass to NamedResource is removed because MyClass already extends NamedResource.
The same rule also applies when extending from Resource.
Note that are special rules for your convenience. Consider creating two new Classes MyClass and MySubClass Both are extending NamedResource by default.


Note that you can directly select the super class in this dialog. While NamedResource is the default you may select**Resource** to create an unnamed resource, or any other Class. For other properties see also Chapter 4.6.1 ch.actifsource.core.Class.


Use the drag and drop feature from the project explorer to add an existing class to your diagram.

Use the context menu on the diagram background.

Use the content menu on any class.


Hide Attributes Hides shown attribute (see also Show Attributes).
Instances Inserts instances of a specific class on the diagram.

Types Shows the types (Class.typeOf statement) of a specific class.
Super Class Shows the superclass (Class.extend statement) of a specific class. You this feature repeatedly to show the inheritance hierarchy.
Open any class in the resource editor by Ctrl+Click on the class name.

The domain diagram editor allows you to create new models based on your meta-model.
You can create a new class diagram via context menu in the project explorer or File/New.

Preselecting a package will directly fill in the resource path and package in the wizard.


As a very simple example, let us define a diagram type for a state machine meta-model.

As the root class (see also Single Root) we choose Statemachine. This means that we can only edit elements that are part of the state machine.
The allowed class is State since we like to edit states. Between states there are transitions. A Transition is an indirect relation from State via Transition to State.

The minimal diagram type shown above leads to a domain specific state event diagram.

Note that defining a rootClass in the DiagramType demands for a singleRoot in the domain diagram.

You can create a new domain diagram for a single root directly by calling New/Domain Diagram on a resource.

Note that the single root is preselected in the wizard and the diagram type is automatically detected if there is a diagram type which has a root class of the same type as the chosen single root.
Use the palette to edit the domain diagram.

Note that you can also enter the edit mode with the Select tool. Click on the text to alter – wait for one second until the cursor changes to text mode – and click again.
Note that you control the palette by AllowedClass.paletteEntry in your diagram type.

Use the drag and drop feature from the project explorer to add an existing resource to your diagram.


Delete from Model Deletes this resource from the diagram and from the model. Use Shift+Delete on the keyboard to delete selected resources from the diagram and from the model.
Hide Resource Deletes this resource from the diagram but not from the model. Use Delete on the keyboard to hide selected resources from the diagram.
Show Resource Shows any hidden resource in the scope of the selected resource. If this action is called on the background of the diagram, the scope is your single root.
Show/Hide Resource Part Shows or hides aggregated parts (see Chapter 4.4.5 Composition).


Router Selects between different routing algorithms.\
| Router | Description | Image |
|---|---|---|
| Default | Manual routing by dragging |

|
| Manhatten | Lines are routed with 90° |

|
| NoIntersection | As few intersections as |

|
Open any class in the resource editor by Ctrl+Click on the class name.

Actifsource automatically detects resources that are also shown on other diagrams. Simply click on the diagram symbol to list and browse the other diagrams.

Domain diagrams are domain-specific by definition. This means that you can define your own domain-specific diagrams.
The Actifsource BuildConfig acts like a make file. It tells Actifsource which build tasks shall be executed. The most important build task for code generation is the TemplateGeneratorTask.
You can create a new build configuration via context menu in the project explorer or File/New.

Actifsource suggests adding templates to the build configuration which are not assigned to any other build configuration yet.

For every selected template, Actifsource creates a so called a TemplateGeneratorTask as shown below.

Build configurations have to be registered with target folders to take any effect (see also Chapter 2.5.3 Target Folder and Chapter 2.6 Project Properties).

For every build configuration you may select the output encoding.

If no output encoding has been set, the one from the parent build configuration (see also Chapter 7.6.2 NestedBuildConfigGeneratorTask), folder, parent folder, project, or workspace is taken (in this order).
Check Properties/Resource/Text file encoding on folder or project.

Check Window/Preferences/General/Workspace/Text file encoding on workspace.

For every build configuration you may select the line break style.

If no line break has been set, the one from the parent build configuration (see also Chapter 7.6.2 NestedBuildConfigGeneratorTask), project, or workspace is taken.

The build configuration lists all build tasks. Build tasks are executed in the order as listed. There are different types of build tasks. The most important one is the TemplateGeneratorTask.
The template generator task defines which templates have to be built.

Template References the template.
Omit File Id Actifsource normally inserts an id at the end of every generated file. This file id helps identify and track generated code.

The Actifsource ID is assembled as follows.
/* Actifsource ID=\[TemplateGUID,SuperContextGUID\*,BaseContextGUID,MD5Hash\] */
| Element | Descriptiom |
|---|---|
| Comment Tags | The comment tags (i.e. /* */) are given by the language |
| Actifsource ID | Static identifier |
| TemplateGUID | GUID of the template which created this file |
| SuperContextGUID | GUID of the resources which contains the base resource |
| BaseContextGUID | GUID of the base resources of this file |
| MD5Hash | A hash code over the generated code but not including protected regions to detect if the generated code has been changed manually. To ignore white spaces when building the MD5 hash check Chapter 2.5.3 Target Folder. |
Note that you can open the resource for any GUID in an Eclipse text editor or in the Eclipse console by Ctrl+Click on the GUID.

The nested build configurator task let you reference and execute existing build configurations.

Copies a file or a folder to a specified target path. Please note that this tasks needs a built-in dependency to WORKSPACE (see Chapter 2.5.6 Built-in Dependencies).

| Resource Type | Description |
|---|---|
| BundleResource | File or folders found in a bundle (plugin project). |
| OutputScopeResource | File or folders found in the target folder. |
| TemplateScopeResource | File or folders found in the template folder. |
| WorkspaceResource | File or folders found in the workspace. |
| Target Type | Description |
|---|---|
| ResourcePathTarget | Target path relative to copied resources. |
| ZipTarget | File and folders are copied into a zip file. |
Deletes the specified folders relative to the target folder. Please note that this tasks needs a built-in dependency to WORKSPACE (see Chapter 2.5.6 Built-in Dependencies).

Executes any process on your operating system. Please note that this tasks needs a built-in dependency to WORKSPACE (see also Chapter 2.5.6 Built-in Dependencies).
To execute a shell command on windows, choose cmd as shell command, /c as first argument, and your shell command and parameters as subsequent arguments.

Runs the graphviz dot command on all .dot files in the target folder. Please note that this tasks needs a built-in dependency to GRAPHVIZ (see also Chapter 2.5.6 Built-in Dependencies).
Make sure that you have graphviz installed (see www.graphviz.org) and reachable in your path.

Styleheet A css stylesheet if needed.
Adapt Size If set to true, the generated diagram's width is set to 100%.
Eclipse supports so called Builders to build anything. In C/C++ there is the CDT Builder to build executables and libraries from header and source files. In Java there is the Java Builder to build .class files from .java files.
In Actifsource there is the Actifsource Builder to generate code from the model (.asr files).
Make sure that the builders are arranged in the correct order. You will find the settings in Project/Properties/Builder.

As already seen in Chapter 1.1 Working with models, the Actifsource Template Editor allows you to write meta-code based on the meta-model. Writing meta-code means to write code along the structures which are given by the meta-model without knowing the specific domain model.

A template is either based on a type (Class, Enum) or not.
| Template Type | Description |
|---|---|
| Based on types | Based on a type means that the Template is applied for every instance of that type. The result is one file per instance. |
| Build once | Build once means that the Template is applied exactly once. The result is one file. |
Creating a template based on a specific type (Class) is the normal case. Consider a nested Parent-Child structure with the following meta-model.

For every specific parent-child structure there is at least a resource of type Parent to start with. So let’s start writing meta-code based on the class Parent
To create a template based on the class Parent simply choose New/Template from the context menu of the class Parent

The New Template Wizard helps to configure the template settings.

Set the options as needed.
| Option | Description |
|---|---|
| Resource Path | The resource path where the template is located (see Chapter 18 resource-paths) Resource Paths). This option is automatically filled in. |
| Package | The package where the template is located. The package is derived from the location where the context menu was called. |
| Template Name | The name of the template. The template name is automatically derived from the Base Type. |
| BuildConfig | The build configuration where this template is referenced (see Chapter 7 Build Config). |
| MetaModel | Make sure to choose Actifsource unless you know exactly what you do. |
| Base Type | The base type is derived from the location where the context menu was called. |
Please note that there is a short way for choosing the package. Just type the first few letters of a package followed by a dot. Using content assist (Ctrl+Space) shows the matching packages.

Creating a template based on a type (i.e. class Parent opens an editor with a predefined selector Build.allParent. This means that this template is executed for all resources of type Parent

To create a Build.once template simply choose New/Template from the context menu of a package. Please note that the template is created in the chosen package.

The New Template Wizard asks for the template name and even allows you to add a base type afterwards using the content assist (Ctrl+Space). Adding a base type leads to a template based on a type (see Chapter 8.2.1 Create a template based on type).

Creating a Build.once template opens an editor with a predefined selector Build.once@BuiltIn. That means that this template is executed only once.

Writing template code is nearly as easy as writing common code – thanks to the Actifsource Template Editor.
The Actifsource Template Editor lets you write code in the context of the meta-model.

The orange bar on the left is the context you are in. Creating a template for the class Parent lets you work in the context of this class.
The context derived from the base type (see Chapter 8.2.1 Create a template based on type) is called base context.
First of all you have to specify a proper name. Since we want to generate a file for any instance of the class Parent, we have to specify a file name that is unique for every Parent instance.

The name of the generated files is derived from the specific resource instance for which code is generated. Use content assist (Ctrl+Space) to access the properties of the class which is bound to the base context by the Selector.

The following file name will create files named Parent.name while Parent.name is replaced by the name of the specific instance of class Parent Text elements referring to the model are called links and displayed underlined.
Please note that the file extension .hpp automatically selects the Language C++ (see Chapter 8.3.3 Language Line and Chapter 8.4 Declaring a Programming Language).

It is also possible to define a folder structure in the file line. The generated files will be placed in the defined folders.

The language line defines the programming language for
Actifsource defines the most common languages. If you are using a language which is not defined by default (see Chapter 8.4.1 Supported Programming Languages), do not hesitate to create one by your own (see Chapter 8.4 Declaring a Programming Language).
You may change the language at any time by using the content assist (Ctrl+Space) on the language line.

Selecting or changing a file extension in the file line (see Chapter 8.3.2 File Line) automatically selects the corresponding language.

Use Ctrl+Click on the language to show the underlying language model (see Chapter 8.4 Declaring a Programming Language).

There are always situations where two or more files belong to each other (i.e. hpp/cpp in C++). Actifsource therefore supports file tabs.
Just press the [+] button right next to the file tabs to add a new file tab.
Note that files tabs are always automatically named the same as the file extension.

Press the X button to delete the active file tab.

Press Ctrl+Tab to select next tab from within the code section.
Let’s assume that we want to generate a file for every Child instance.

For that reason we create a template with Child as base type.

Since Child is owned by Parent.child, Actifsource automatically provides you with a super context of type Parent

Please note that the base context (i.e. Child in this example) is the widest bar (
 ).
).

Let’s start writing code. First we write a C++ class named Parent.name while Parent.name is replaced by the name of the specific instance of class Parent
Note that the keyword class is bold and has a special color as defined in the language C++ (see Chapter 8.4 Declaring a Programming Language).
To insert a reference to the meta-model just use content assist (Ctrl+Space) at any time.

Underlined words are so called links which are directly linked with your model.
Note that renaming resources in the meta-model automatically renames all links in the template synchronously.

You can always navigate to the corresponding resource in the model by using Ctrl+Click on the links as shown below or the
 tool from the toolbar.

Saving the above template leads to one file for every resource of type Parent in your project.

A build config is needed to work with resources from other projects (see Chapter 7 Build Config).
Please note that you might insert type names directly in the template code by using the content assist (Ctrl+Space). If the desired type name is not available, press Ctrl+Space again to get all available type names.

The type name is inserted just as given. The advantage of using type names in the template is the automatic renaming if the name of the type is changed.

You can always open a resource link in the template editor.

| Action | Opens | Description | |
|---|---|---|---|
| Ctrl+Click | Default Editor | Press Ctrl+Click on the link to open the resource | |
| F3 | Default Editor | Press F3 on the current cursor position to open the resource | |

|
Default Editor | Click Open Link in ResourceEditor from toolbar on the current cursor position to open the resource | \ |
To open a function link in the function editor use the default editor. To open the function model use the resource editor (see below).
| Action | Opens | Description |
|---|---|---|
| Ctrl+Alt+Click | Resource Editor | Press Ctrl+Click on the link to open the Editor resource |
| Alt+F3 | Resource Editor | Press F3 on the current cursor position to open Editor the resource |

|
Resource Editor | Click Open Link in ResourceEditor from the toolbar on the current cursor position to open the resource |
Actifsource knows three different types of contexts.
 from the toolbar or press Alt+Insert.

 from the toolbar or press Alt+Shift+Insert.

The content of the Protected Regions is saved before regenerating and inserted in the newly generated file. Use Protected Regions to insert handwritten code into generated files.
Note that Protected Regions are identified by the GUID of the resource of the current context. Use Ctrl+Click on the GUID to navigate to the corresponding resource.

The protected context consists of one or more lines in a file. The text in the protected context is repeated for any resource reached by the selector (see Chapter 8.3.10 Working with Context) and generated. To insert a protected context use the Insert ProtectedContext tool
 from the toolbar.

Note that you can control the GUIDs that identify the protected regions by checking the resources in the context path. Just make sure that the resulting set of GUIDs is unique in your generated file. You might also define a name for the Protected Region.

Please note that changing the name of the Protected Region or the involved resources leads to new Protected Regions while the old once are moved to the end of the file.
Adding and removing a context is one of the most important operations when working with the Template Editor.
Use the Template Editor Toolbar to add, remove or navigate contexts.

| Context Operation | Icon | Shortcut | Description |
|---|---|---|---|
| Select TopContext |

|
Alt+Home | Selects the top context |
| Select |

|
Alt+PgUp | Selects the parent context from the actual context |
| Select |

|
Alt+PgDown | Selects the child context from the actual context |
| Select |

|
Alt+End | Selects the bottom context |
| Insert LineContext |

|
Alt+Insert | Inserts a line context in the actual context |
| Insert |

|
Alt+Shift+Insert | Inserts a column context in the actual context |
| Insert |

|
Inserts a protected context in the actual contextt | |
| Delete Context |

|
Alt+Delete | Delete the actual context |
Navigate Context via Select Tools Using the Context Select Tools in the Toolbar you might change the selection of the context from parent to child and vice versa.

Navigate Context via Breadcrumb A context can be selected by clicking on the Breadcrumb.

Navigate Context via Context Bar A context can also be selected by clicking on the context bar.

Add Context A new context is always added after the actually selected context. Navigate to a certain context before inserting a new context as shown above.
Let’s assume that we want create a function identifyChild.name for every child in the parent context. For that reason we insert a new context using the Insert LineContext tool
from the toolbar.

As a second step you have to declare a selector (see Chapter 8.3.12 Selector) to define the context.
Since our base context is Parent we have to traverse the relation Parent.child to reach all children from parent.

Choose the relation Parent.child for the selector using content assist (Ctrl+Space).

Using content assist in the new context you are now able to use links on resources of type Child

To complete the task from above insert a function named identifyChild.name

Line 4 is now repeated for any resource of type Child reached by the relation Parent.child

To create a new context with the selector Parent.child just insert the link Parent.child using context assist (Ctrl+Space). A light bulb
 indicates that there is a quick assist available. Click on the light bulb or press Ctrl+1 to open the quick assist.

You are now allowed to create a line context or a column context directly with Parent.child as the selector.

A new context is inserted with the desired selector. Parent.child is automatically replaced by Child which is the result of the selector.


Consider two contexts that follow each other (line 4 and 5 in the following example). How to insert new content between line 4 and line but in the base context?

Place the cursor on the end of line 4 as shown above and press cursor right. The cursor will still remain at the same position but the context selection will change to the parent context.

Entering a new line is done in the selected parent context and results in a new line between the existing contexts.

Copy (Ctrl+C) and Paste (Ctrl+V) in the Template Editor has some special features to work with links and contexts.


If you have to copy the line context C on line 2 just navigate to the base context (see Chapter 8.3.10 Working with Contexts) what makes the line context a nested context.

There is also a command Copy with Context in the context menu which allows to specify the position from which context are copied. The following situation shows a selection on line 2 where the copy operation allows to copy with context C or B

Please note that it makes no sense to copy the base context (see Chapter 8.3.1 Base Context) or even the super context (see Chapter 8.3.5 SuperContext) because they are part of the whole template.
The selector allows navigating the meta-model and is extremely powerful. Please consult Chapter 9.3.2 SelectorFunction for details.
Use the Switch to Selector tool from the tool bar or Alt+Enter to navigate from the code to the selector. Use Enter in the selector to jump back to the code.


The subsequent template iterates over Container.element and prints the name of every element.

Let’s assume that we write template code that shall produce different code depending whether Container.element is of type ElementA ElementB or ElementC
A straightforward solution is introducing a context with a type cast for type in the inheritance hierarchy.

The problem is that a resource type of ElementC is also of type ElementB and ElementA Therefore the above template prints lines 2, 3 and 4 for resources f type ElementC But the intention is that only line 2 is printed.
Use the break flag in the selector for the desired behavior. If the break flag is set all subsequent context of the same level are skipped. Users familiar with programming language C or C++ can think of the switch/case/break statement.
The following template prints line 2 for resource types of ElementC and then breaks the current iteration to continue with the next resource for Container.element

Please note that a context with a break flag is displayed with a ground beam.

Use line attributes on a line context to control the output specific positions of a resource in a list. Place the cursor on the desired line to apply a line attribute.

There are five different types of line attributes which might be applied to a line context.
| Context Operation | Icon | Shortcut | Description |
|---|---|---|---|
| First |

|
Alt+1 | The first element of the iteration |
| Not First |

|
Alt+2 | All elements of the iteration except the first |
| Not Last |

|
Alt+3 | All elements of the iteration except the last |
| Last |

|
Alt+4 | The last element of the iteration |
| Empty |

|
Alt+5 | For empty iterations |
The following template prints the comment on line 7 only for the first element of the iteration over the list Parent.child Please note that line 7 is not printed if Parent.child is empty.

The following example prints a comment on line 8 if Parent.child is empty.

Use column attributes on a column context to control the output specific positions of a resource in a list. Select the desired characters to apply a line attribute.

There are five different types of column attributes which might be applied to a column context.
| Context Operation | Icon | Shortcut | Description |
|---|---|---|---|
| First |

|
Alt+1 | The first element of the iteration |
| Not First |

|
Alt+2 | All elements of the iteration except the first |
| Not Last |

|
Alt+3 | All elements of the iteration except the last |
| Last |

|
Alt+4 | The last element of the iteration |
| Empty |

|
Alt+5 | For empty iterations |
The following example prints the comma after Param.name for all elements of the iteration except the last.

The next example prints void on line 7 if Parent.child is empty.

As shown in Chapter 9.2 Function Space the Template acts as a Functions Space. Therefore functions might be placed directly in the template (see Chapter 9 Functions for details).

Function calls are displayed in italic. In the subsequent example there is a call to Parent.className where className is the function.

To see the model of a function within a template just open the folding
 on the template.

If a function is placed in a function space other than the own template the function call is displayed with the name of the function space after the @ sign. Parent.className@MyFunctionSpace indicates a function call where the function className is located in the function space MyFunctionSpace

The Actifsource Template Editor allows you to extract selected expressions as functions. Please consider extracting complex expression if you use them more than once.

Selecting an expression which might also contain links leads to a
 light bulb on the left side which indicates that there is a Quick Assist available. Click on the light bulb or press Ctrl+1 to open the Quick Assist.

The path from the outermost to the innermost context is called Context Path. Actifsource uses the Context Path to determine the parameters of a function (see Chapter 9.2.1 Function Parameters).
Consider the following meta-model:

The subsequent template shows nested contexts based on the above meta-model. Please note that the breadcrumb displays the context path for the actual cursor position.

The template shows the following context paths.
| Line | Context Path |
|---|---|
| ine 1 | A |
| Line 2 | A, B |
| Line 3 | A, B, C |
| Line 4 | A, B, C, D |
Calling a function with parameters is only allowed if the context path is matching.
The following function fD C B A is based on Class D and declaring the parameters c of type C b of type B and a of type A

Calling fD C B A is only allowed if the context path contains at least A B C, and D in the given order.

Consider a function fD A which is based on Class D and declaring a parameter a of type A It is allowed to call this function on the context path A B C, and D because it contains A and D in the correct order.

The Actifsource Template editor does syntax highlighting for keywords, comments, and strings. The actual selected language is determined by the Language Line (see Chapter 8.3.3 Language Line).
Currently Actifsource supports syntax highlighting for the following programming, script, markup, or domain languages.
| Programming Language | Description | File Name Extension |
|---|---|---|
| Ada | ada | |
| C | c, h | |
| C# | Microsoft C Sharp | cs |
| C++ | cpp, hpp | |
| Cobol | cob | |
| Css | Cascading Style Sheet | css |
| D | d | |
| Delphi | dfm | |
| Eiffel | e | |
| Erlang | erl, hrl | |
| GraphViz | www.graphviz.org | dot |
| Groovy | groovy | |
| Haskell | hs | |
| Html | Hyper Text Markup Language | html, xtml |
| Java | java | |
| JavaScript | js | |
| Modula2 | mod | |
| Oberon | pas | |
| OmgIdl | www.omg.org | idl |
| Pascal | pas | |
| Perl | pl | |
| Php | php | |
| Python | py | |
| Ruby | rb | |
| Scala | scala | |
| Sql | Structured Query Language for RDBMS | sql |
| StructuredText | see wikipedia | st |
| Svg | Scalable Vector Graphics | svg |
| Text | Plain text | txt |
| VisualBasic | Microsoft Visual Basic | vb, vba |
| Xml | Extensible Markup Language | xml |
To create your own template language model just instantiate the class TemplateLanguage.

fileNameExtension The file name extension of the template language is used to automatically select the language line (see Chapter 8.3.3 Language Line) from the file extension in the file line (see Chapter 8.3.2 File Line).
keywordStyle A list of keywords including the syntax style (color, font modifier)

stringStyle A declaration of start and end tag for strings including the syntax style (color, font modifier)

singleLineComment A declaration of the start tag for single-line comments including the syntax style (color, font modifier)

mutliLineComment A declaration of start and end tag for multi-line comments including the syntax style (color, font modifier)

You might define your own template language defining the same file name extension as a built-in language. Actifsource will handle user-defined template languages with higher priority so that you can overwrite the standard.
Actifsource functions might be called from templates (see ChapterTemplate Editor), from other functions, or from selector relations (see Chapter 4.4.7 SelectorRelation). There are different supported types of functions (see Chapter 9.3 Function types).
The function space is the resource where functions are living. We know two different types of functions spaces, both derived from AbstractFunctionSpace.
FunctionSpace is the place where you can place any function. Template is a code template where you can place functions in the scope of the template.

Functions are grouped by a FunctionContext. By the typeRef, the FunctionContext is bound to a Class or an Enum. Functions in the function context are applicable on instances of types referenced by typeRef.

Note that Actifsource prohibits more than one function context with the same typeRef in the same function space.
A function might define a set of parameters. If calling a function from a template, Actifsource automatically tries to match with the context path (see Chapter 8.3.17).
Function parameters are defined in the model of the specific function type (see Chapter 9.3 Function types).

Using function parameters in a template function (see Chapter 9.3.6 TemplateFunction) leads to the corresponding super contexts (see Chapter 8.3.5 SuperContext).

Using function parameters in a java function (see Chapter 9.3.3 SelectorFunction)
Selector functions allow you to navigate the model by using the selector syntax. Starting from a Class defined by FunctionContext.typeRef you may navigate via the resource properties.
Selectors might be used in Templates to select a context. But selectors might also be called from within selectors – even recursively.
Forward navigation Consider the following meta-model.

We like to define a selector function named getSubChild on Parent which returns all sub-children in all children of the parent. The return type when navigating along a property is given by the range of the property, i.e, in our example the expected return type is a list of elements of type SubChild To navigate from Parent via child to subChild just assemble a selector Parent.child.subChild Make sure to use content assist (Ctrl+Space) when writing selector functions.

This is what a selector function could look like.

To get the Parent instance for a SubChild instance we have to navigate backwards via the subChild and child relation. The selector allows backward navigation via the minus relation.

| Operator | Description |
|---|---|
A union B |
The result is the concatenation of the two lists A and B. For example, [a1,a2] union [a3,a1] is equal to [a1,a2,a3,a1]. |
A intersect B |
Only elements found in A and in B where duplicates are preserved and the resulting order is given by A. For example, [a1,a1,a2,a2] intersect [a2,a1,a1] is equal to [a1,a1,a2]. |
A except B |
For all elements b in B, the first occurrence of b in A is removed from A. For example, [a2,a1,a3,a2,a1] except [a1,a2,a1] is equal to [a3,a2] |
A else B |
All elements in A if a is empty, otherwise all elements in B. For example, [a1, a2] else [b1,b2] is equal to [a1,a2] and [] else [b1,b2] is equal to [b1,b2]. |
A then B |
All element in B if A is not empty else empty list (i.e (A then B else C)). |
A excludefilterA.c |
All elements from the set A with the exception of the elements for which A.c is evaluated to empty or boolean true. |
A includefilterA.c |
where the expression A.c must be evaluated as not empty or Boolean true. |
A getindexi |
Selects the element at position i ($i \in \mathbb{Z}_{0}^{+}$) from the list of elements of A. For example [a2,a1,a3,a2,a1] getindex 2 selects a3. |
Note that you can use brackets to control precedence (i.e. (A.x union A.y) intersect A.z). The result type of the union, intersect and else operator is the most concrete supertype of the type of the two operands (e.g. if A is of type NamedResource and B is of type Resource, then A intersect B A union B and A else B are all of type Resource). After brackets you can continue the selector (i.e (A.x union A.y).typeOf).

If you only like to get Leaf components from the Client, just use the type cast operator (colon).

Up Cast It is always possible to use an upcast to a base class (i.e. Resource or NamedResource) if needed.
Self Cast If your selector has to return the typeRef instance itself, use the self-cast. Consider the following selector function for Component returning the component instance itself.


There is an easy way to find the Client of this recursive model using selectors. First, we collect all components including the own component and all parent components.
For that reason we write a selector function for Component which returns the component itself and also all parent components which are reachable by going backwards via the component relation.

To get the Client which is parent of all component just collect all component first by using the above selector functions. From all this components in the collected set there is only one instance aggregated by Client. Let’s write a selector function for that.
Please take extra care because there are two relations named component. One is Composite.component the other one is Client.component Make sure to use Composite.component in allComponent and Client.component in getClient

[TBD]
leads to the corresponding java function arguments.

Function calls are polymorphic if a function has the same name, the same parameters and a typeRef to a sub class.

In the following example, the function identify is defined for MyClass and MySubClass. There will be a polymorphic call to MyClass.identify dependent on the type of the instance.

There are situations where polymorphic calls are not desired. You have to disable polymorphic calls on every caller. Use the context menu Change to non-virtual call on the function.

A small arrow indicates the non-polymorphic call.

Polymorphic calls are supported in the same function space by default. Extending another function space enables polymorphic calls over functions spaces.

Actifsource supports different types of functions.

Abstract functions shall only be defined on types with an abstract modifier (see Chapter 4.6.1 ch.actifsource.core.Class).
For an abstract function, there must be non-abstract function for any non-abstract subclass in the same function space or in a function space that extends it.

Selector functions allow you to navigate the model by using the selector syntax. Starting from a Class defined by FunctionContext.typeRef you may navigate via the resource properties.
Selectors might be used in Templates to select a context. But selectors might also be called from within selectors – even recursively.
We like to define a selector function named getSubChild on Parent which returns all sub-children in all children of the parent. The return type when navigating along a property is given by the range of the property, i.e, in our example the expected return type is a list of elements of type SubChild
To navigate from Parent via child to subChild just assemble a selector Parent.child.subChild Make sure to use content assist (Ctrl+Space) when writing selector functions.
This is what a selector function could look like.
To get the Parent instance for a SubChild instance we have to navigate backwards via the subChild and child relation. The selector allows backward navigation via the minus relation.
| Operator | Description |
|---|---|
| A union B | The result is the concatenation of the two lists A and B. For example, [a1,a2] union [a3,a1] is equal to [a1,a2,a3,a1]. |
| A intersect B | Only elements found in A and in B where duplicates are preserved and the resulting order is given by A. For example, [a1,a1,a2,a2] intersect [a2,a1,a1] is equal to [a1,a1,a2]. |
| A except B | For all elements b in B, the first occurrence of b in A is removed from A. For example, [a2,a1,a3,a2,a1] except [a1,a2,a1] is equal to [a3,a2] |
| A else B | All elements in A if a is not empty, otherwise all elements in B. For example, [a1, a2] else [b1,b2] is equal to [a1,a2] and [] else [b1,b2] is equal to [b1,b2]. |
| A then B | All element in B if A is not empty else empty list (i.e (A then B else C)). |
Note that you can use brackets to control precedence (i.e. (A.x union A.y) intersect A.z). The result type of the union, intersect and else operator is the most concrete supertype of the type of the two operands (e.g. if A is of type NamedResource and B is of type Resource, then A intersect B A union B and A else B are all of type Resource).
If you only like to get Leaf components from the Client, just use the type cast operator (colon).
Up Cast It is always possible to use an upcast to a base class (i.e. Resource or NamedResource) if needed.
Self Cast If your selector has to return the typeRef instance itself, use the self-cast. Consider the following selector function for Component returning the component instance itself.
There is an easy way to find the Client of this recursive model using selectors. First, we collect all components including the own component and all parent components.
For that reason we write a selector function for Component which returns the component itself and also all parent components which are reachable by going backwards via the component relation. $
To get the Client which is parent of all component just collect all component first by using the above selector functions. From all this components in the collected set there is only one instance aggregate by Client. Let’s write a selector function for that.
Please take extra care because there are two relations named component. One is Composite.component the other one is Client.component Make sure to use Composite.component in allComponent and Client.component in getClient
[TBD]
Actifsource supports user-implemented Java functions that make use of the very powerful Javamodel to access the Actifsource models from Java code (see also Section 9.5).

When you declare a Java function, Actifsource automatically generates a function skeleton in a file with the same name as your function space found in the folder src-gen.

You should only modify generated files within protected regions (see Chapter 2.12.5 Protected Regions). Take extra care that import statements are placed within the protected regions – especially if inserted automatically by the Java content assist.

As function arguments, an instance of type FunctionContext.typeRef and all parameters are passed. Use the Java content assist (Ctrl+Space) to display available functions. To access properties choose myClass.selectMyProperty(). For more information on how to access the Javamodel see Chapter 9.5.

A Java function has a return type which is either a Type or a TypeReference.
A Type is either a SimpleType or a ListType. A SimpleType can, in particular, be a ClassType, which references any Class, or a LiteralType, which references any Literal. For a LiteralType the return type of the generated Java function is the Java class given by the return value of the method getValueType() of the ILiteralAspect (e.g. in the example above the LiteralAspect of StringLiterals (ch.actifsource.core.model.aspects.impl.String.StringLiteralAspect) defines that java.lang.String represents StringLiterals and, therefore, the the return type of identify is java.lang.String). A ListType references either a Class or a Literal (more precisely, it actually references an AbstractType). The return type of the generated Java function is then a java.util.List<Class>, where Class is the Java class that corresponds to the Literal or the Class. Note that in the latter case the Java class is the wrapper Java class that corresponds to the Actifsource Class and is provided by the Javamodel (see also Chapter 2 and Section 9.5).
A TypeReference is either a GenericContextType or a GenericContextListType. In the first case, the return type of the generated Java function is <T extends C T where C is the Java class corresponding to the type of the element the function is called on (the this-instance). In the second case, the return type of the generated Java function is a <T extends C> java.util.List<T> where T is defined as before (see examples below).
Note that function with a return type of GenericContextType or a GenericContextListType can be applied to elements of any sub-type of the type given by typeRef of the FunctionContext, i.e., the this-parameter of the generated Java function is <T extends Class> T where Class is the Java wrapper class corresponding to the typeRef of the FunctionContext.


Java list functions can be applied to a list of elements defined by a Selector expression, e.g. in the Selector expression Parent.child.myFunction@ChildFunctionSpace the function myFunction is called on the list of all Children reachable from Parent via the relation child (see example in Section 9.3.2). The this-parameter of the generated Java function is then of type java.util.List<\> where C is the Java class corresponding to the typeRef of the FunctionContext (respectively java.util.List<T extends C> if the returnType of the Java list function is GenericContext(List)Type). Consider the following example that is based on the meta-model from Section 9.3.5:


The return types of JavaListFunctions are determined in the same way as for JavaFunctions (see Section 9.3.3). A list of built-in (Java) list functions is presented in Section Fehler! Verweisquelle konnte nicht gefunden werden..
Consider an extended meta-model where Parent can be referenced by a ParentContainer via a relation parent:

In this case, the selector ParentContainer.parent.child.myFunction@MyFunctionSpace constructs for each Parent the list of Children reachable from this Parent and then applies the function myFunction to each of these lists. If the function should be applied to the list of Children reachable indirectly via parent we can write a (Selector)Function that returns a list of all these Children e.g. ParentContainer.getAllChildren@MyFunctionSpace where getAllChildren is a SelectorFunction with the selector ParentContainer.parent.child In the selector ParentContainer.getAllChildren@MyFunctionSpace.myFunction@MyFunctionSpace the function myFunction is only called once on the list of all Children reachable from ParentContainer.
[TBD]
A template function behaves in the same way as a template, but there are no files generated from a template function. Just think of a template function as a sub template which can be expanded in a template or in another template function (also recursively).
Consider the following meta-model:

Let us now write a template function for a component which writes the name and type of the component and, if the given component is a composite, also does the same recursively for all subcomponents.
First of all we have to define the template function in the model.

To open the template function with the template editor, just double click in the Project Explorer. Use the Link with Editor tool (see Chapter 2.10.1 Link with Editor) to easily locate the template function in the project explorer.

In line 1 we write out the component name and its type name. In line 2 we iterate over all aggregated components, but only if the component is of type Composite (type cast). In this context we call the template function asText recursively for all aggregated component.
Note the indention of two spaces on line 2. Actifsource takes care of the indentions so that the whole content of the template function is indented.

We can now call our template function from a template. If there is a call to a function from another function space, the function space is explicitly stated using the notation myFunction@MyFunctionSpace.

Next, we create an instance of type Client containing composites and leaves. The output from the above template might look as follows.
Note that the indention is applied recursively.

The template line function behaves like a template but without the possibility to set contexts (see Chapter 8.3.9 Line Context, Column Context, Protected Context). The template line allows you to create simple single line texts as for name aspects (see Chapter 4.6.1 ch.actifsource.core.Class).
Consider a resource Person with two string literals firstName and LastName

Write a template function for person, which prints out the person's last name and first name.

Simply use the template line function as name aspect in the class Person.

Please not that it is also possible that the selector of the name aspect can be used directly as template line.

Note that Person is only a Resource but not a NamedResource. The attributes firstName and lastName are therefore just normal properties.

Defining the name aspect as seen above synthesizes the name.

Actifsource provides lots of useful built-in functions.
Actifsource provides the following built-in functions on Any.
| Function | Return type | Description |
|---|---|---|
| guid | Literal | Gets the unique identifier of any Resource or Literal. (For Resources it is a GUID, for Literals it is the Literal itself.) |
Actifsource provides the following built-in functions on List of Any.
| Function | Return type | Description |
|---|---|---|
| count | IntegerLiteral | Counts the number of elements in the list |
| isEmpty | BooleanLiteral | Returns true if and only if the list is empty. |
| isSet | BooleanLiteral | Returns true if and only if the list contains no duplicates. |
| first | T | Returns the first element in the list. |
| last | T | Returns the last element in the list. |
| count | IntegerLiteral | Counts the number of elements in the list. |
| reverse | List of T | Reverses the elements in the list. |
| distinct | List of T | Remove duplicates from a list, first to last. |
Actifsource provides the following built-in functions on Resource.
| Function | Return type | Description |
|---|---|---|
| package | String | Returns the package of the resource as string. |
| guid | String | Returns the GUID of the resource as string. |
| simpleName | String | Returns the Resource’s name as defined by its NameAspect. If the resource extends NamedResource, the NameAspect returns the value of the name attribute. If no NameAspect is defined, the GUID of the resource is returned. |
Actifsource provides the following built-in functions on List of Resource.
| Function | Return type | Description |
|---|---|---|
| sortByGuid | List of T | Sorts the list of resources by their GUIDs. |
| sortBySimpleName | List of T | Sorts the list of resources by their names. |
Actifsource provides the following built-in functions on Literal.
| Function | Return type | Description |
|---|---|---|
| guid | T | Gets the identifier of the Literal value. |
Actifsource provides the following built-in functions on IntegerLiteral.
| Function | Return type | Description |
|---|---|---|
| increment | Integer | Increments an integer number. |
| decrement | Integer | Decrements an integer number. |
| notZero | Integer | Returns the number unless it is zero. |
Actifsource provides the following built-in functions on List of IntegerLiteral.
| Function | Return type | Description |
|---|---|---|
| sum | Integer | Calculates the sum of a list of integer numbers. |
| minimum | Integer | Returns the minimum integer in a list. |
| maximum | Integer | Returns the maximum integer in a list. |
Actifsource provides the following built-in functions on BooleanLiteral.
| Function | Return type | Description |
|---|---|---|
| isFalse | Boolean | Returns true if the Boolean value is false. |
Actifsource provides the following built-in functions on List of Character.
| Function | Return type | Description |
|---|---|---|
| string | Boolean | Builds a string from characters. |
Actifsource provides the following built-in functions on List of Letter.
| Function | Return type | Description |
|---|---|---|
| string | Word | Builds a word from letters. |
Actifsource provides the following built-in functions on TextLiteral.
| Function | Return type | Description |
|---|---|---|
| suppressIndent | Text | Sets the current intent mode to ‘suppress indent’: All lines after the first line start at the very beginning of the line. If applied in a template function, the setting of the outer template is not affected. The return value is the text itself. |
| indent | Text | Sets the indent mode to ‘indent’ (=default). All lines will start at the same position as the first line. (The preceding characters in the first line are copied, non-whitespace characters replaced by whitespaces.) If applied in a template function, the setting of the outer template is not affected. The return value is the text itself. |
| prefix | Text | Sets the indent mode to ‘prefix’. All lines will repeat the preceding characters in of the first line. If applied in a template function, the setting of the outer template is not affected. The return value is the text itself. |
| splitLines | List<String> | Splits text at line breaks into a list of strings. |
| split80 | List<String> | Splits text into a list of strings of maximum 80 characters. Words are considered atomic, if possible. |
| split100 | List<String> | Splits text into a list of strings of maximum 100 characters. Words are considered atomic, if possible. |
| escapedString | String | Escapes the text such that it can be embedded into C, C++ or Java source code. Escaping for C/C++ only works for ASCII characters. |
| notEmpty | Text | Returns the text unless it is empty. |
Actifsource provides the following built-in functions on StringLiteral.
| Function | Return type | Description |
|---|---|---|
| character | List of Character | Gets the characters in the string. |
| length | Integer Gets the number of characters in the string. | |
| toFirstUpper | String | Gets the same string with capital first letter. |
| toFirstLower | String | Gets the same string with small first letter. |
| toAllUpper | String | Gets the string in all capital letters. |
| toAllLower | String | Gets the string in all small letters. |
| camelcapToUnderscore | String | Inserts an underscore before every uppercase letter unless it is the first letter in the string. |
| whitespaceToCamelcap | String | Replaces letters behind one or many whitespace characters by their uppercase counterparts, replacing those whitespace |
| characters. | ||
| whitespaceToUnderscore | String | Replaces all whitespace characters by underscore characters. |
| split80 | List of String | Splits the string into a list of strings of maximally 80 characters. |
| split100 | List of String | Splits the string into a list of strings of maximally 100 characters. |
| packageToDirectory | String | Replaces '.' by '/'. |
| isNotEmpty | Boolean | Returns true if and only if the string is not an empty string. |
| escapedString | String | Escapes the string such that it can be embedded into C, C++ or Java source code. Escaping for C/C++ only works for ASCII characters. |
| part | List of Literal | Parses the string into words, natural numbers and special characters, removing whitespaces. |
Actifsource provides the following built-in functions on Build.
| Function | Return type | Description |
|---|---|---|
| character | Letter | Gets the letters in the word. |
Actifsource provides the following built-in functions on Build.
| Function | Return type | Description |
|---|---|---|
| timestamp | Long | Returns the GUID's timestamp in nanoseconds starting from Oct 15, 1582. |
| time | Time | Returns the GUID's time. |
| identify | Resource | Returns the Resource identified by the GUID. |
Actifsource provides the following built-in functions on Build.
| Function | Return type | Description |
|---|---|---|
| once | Build | Used in the selector of the template. Build.once means a template is not based on a resource but only built once. |
Actifsource provides the following built-in functions on LinkSelector.
| Function | Return type | Description |
|---|---|---|
| selectorText | String | Converts a selector to simple text string. |
| selectorResultType | AbstractType | Calculates a selectors result type. |
Actifsource provides the following built-in functions on File.
| Function | Return type | Description |
|---|---|---|
| contents | Text | Returns a file's contents. |
It is possible to access the model, other functions (see chapter 9.3 Function types), or even built-in functions (see chapter Fehler! Verweisquelle konnte nicht gefunden werden. Fehler! Verweisquelle konnte nicht gefunden werden.) from within Java functions.
Consider the following meta-model for the subsequent examples:

Let’s write a Java Function for Parent which returns only instances of type Child with names beginning with “A”.
Start by declaring a Java Function named filterChild as seen in Chapter 9.3.3.

For the model forward access use the selectProperty() function on the given resource where property is the property to select.
The subsequent filter function iterates over the relation Parent.child in the for-Statement via parent.selectChild(). Then we check if Child.name starts with “A” via child.selectName(). If the condition is fulfilled we add the filtered child to the child list. At the end we return the child list with the filtered children.

You might use the filter function in the selector of a template or in any other function. The following template only prints children with names starting with “A”.

Using the selector syntax accessing the model backwards is quite easy (see chapter 9.3.2 SelectorFunction) by the minus sign. Accessing the model backwards is also possible in the Java code.
For the model backward access use the static function selectToMeProperty() on the class which defines the relation.
Since we want to access the relation Parent.child backwards we have to choose the static method Parent.selectToMeChild() providing the actual child as parameter. As a result we get the parent of the given child.

Use the extension mechanism to access any of your functions from within Java Code.
Note that the extension mechanism also supports polymorphic calls (see chapter Fehler! Verweisquelle konnte nicht gefunden werden. Fehler! Verweisquelle konnte nicht gefunden werden.).
Let’s assume that we have a function filterChild as shown in chapter 9.5.1 Model forward access. Let’s write a Java function filterChildReverse which returns a reverse list of the filtered children based on filterChild.
For the function access use the extension() function on the given resource with FunctionSpace.ITypeRefFunctions.class as parameter. FunctionSpace is the function space where your function is defined. TypeRef is FunctionContext.typeRef. The static property .class is given from Java and represents a class as an object.

Use the extension mechanism to access built-in functions on resources (see chapter 9.4.1 Built-in functions on Any
Actifsource provides the following built-in functions on Any.
| Function | Return type | Description |
|---|---|---|
| guid | Literal | Gets the unique identifier of any Resource or Literal. (For Resources it is a GUID, for Literals it is the Literal itself.) |
Actifsource provides the following built-in functions on List of Any.
| Function | Return type | Description |
|---|---|---|
| count | IntegerLiteral | Counts the number of elements in the list. |
| isEmpty | BooleanLiteral | Returns true if and only if the list is empty. |
| isSet | BooleanLiteral | Returns true if and only if the list contains no duplicates. |
| first | T | Returns the first element in the list. |
| last | T | Returns the last element in the list. |
| count | IntegerLiteral | Counts the number of elements in the list. |
| reverse | List of T | Reverses the elements in the list. |
| distinct | List of T | Remove duplicates from a list, first to last. |
Built-in functions on Resource) from within Java Code. Accessing built-in functions is done the same way as seen in the above chapter 9.5.3 Function access.
To write a function which returns the package and the simpleName of a child we can reuse the built-in functions package() and simpleName() For the built-in function access use the extension() function on the given resource with BuiltinResourceFunctions.class as parameter.

Note that you cannot access built-in functions for literals via the extension mechanism.
Actifsource supports a special editor, the so-called Code Snippet editor, which allows the user to insert Actifsource resources as variables or functions into snippets of source code. Such a snippet of code is essentially a list of statements written in C-, where C- is a subset of the programming language ANSI C. A more precise definition of C- will be given below. Actifsource then provides the possibility to generate code in an arbitrary target language from these code snippets. This is achieved by parsing the input code according to the grammar of C- and applying either built-in or user-provided templates to the resulting parse tree. This parse tree is actually a model composed of temporary (i.e. non-persistent) resources. The following example shows a code snippet here the underlined identifiers are resources used as variables and functions:

First, we will show how to add a code snippet relation to a class and define all the necessary properties of this relation. Such a relation enables the code snippet editor on instances of this class and allows a user to add code written in the chosen input language to the resource. Most of the examples and screenshots in the following are taken from the Code Snippet tutorial available at http://www.actifsource.com/tutorials/index.html. This tutorial is based on the following meta-model for statemachines and shows how to add code snippets for conditions on transitions and for actions taken when a condition is executed.

To add code snippets to resources of type MyClass, you have to edit MyClass in the resource editor, add a new property and choose the type StructuredCodeSnippetRelation for the relation in the Type Selection dialog:

In the resulting property, you have to create the following statements: subjectObjectCardinality, objectCardinality and name as for Own- or Association (see Section 4.3).
Additionally, we define the CodeSnippetRelationAspect as shown below with the class
ch.actifsource.codesnippet.metamodel.aspect.impl.StructuredCodeSnippetRelationAspect.

Next, we choose an input language for the code snippet.

The input language is used to check the input code syntactically and to highlight keywords of the language. Furthermore, the input language defines which parser will be applied to the input code when generating output code from the code snippet. See Section 10.3 for a description of the available input languages.
Finally, we need to define which resources will be available as functions and variables in the code snippet editor. This is done by creating one or more token statements referring to a RelationTokenProvider. The RelationTokenProvider allows the user to define a selector (cf. Section 8.3.12) which defines a list of resources. Additionally, it allows you to choose a tokenType which is either
ch.actifsource.codesnippet.metamodel.TokenType.Variable for variables orch.actifsource.codesnippet.metamodel.TokenType.Function for functions.

For variables you can define sub-tokens. The definition of sub-tokens instructs the Content Assist to propose all resources defined by the selector of the sub-token when you insert a '.' after a token. This means that sub-tokens can be used to insert resources as identifiers of fields in structs where the token corresponds to the struct and the sub-token to the field (for details see Section 0 below).
At the moment, the following languages are available: C-, CMinusCondition and Text.
The language C- is a (proper) subset of the language ANSI C. It has the following restrictions:
C- supports no declarations (of variables, functions or types)
C- does not support the use of pointers and addresses
C- does not support type casts
C- does not support conditional statements (Expression ? Expression : Expression). However, they can easily be replaced by equivalent if-statements.
The comma operators is not supported, i.e., expressions such as
X = 2, z = 42Foo(x,(y=2,y))
are not valid.Postfix and prefix increment and decrement operators (++,--) are not supported.
C- supports access to fields of structs. As identifiers for fields either variables or arbitrary identifiers are valid. The Content Assist provides proposals for fields of structs if the variable definitions are created accordingly (see Section 10.4.1 ).
C- knows the following list of keywords: break, else, switch, return, continue, for, default, do, if, while, until, case.
Furthermore, the language knows the following operators:
||, &&, |, ^, &, ==, !=, <, >, <=, >=, <<, >>, +, -, *, /, %}!, ~, +, -}=, *=, /= , %=, +=, -= , <<= , >>= , &=, ^= , |=}A code snippet with CMinusCondition allows the user to input a conditional expression as in ANSI C (e.g. a relational or equality expression) while the same restrictions apply as for C- (details see Section 10.3.1). Such an expression can then be used for example as the condition in an if-statement.
Text allows the user to insert arbitrary text with resources added as either variables or functions. This language should only be used if C- is too restrictive and validation of the input code is not required. The input code is syntactically not validated[^1] and the resulting parse tree is very simple:

The code snippet editor is available in the resource editor for any property of type StructuredCodeSnippetRelation. The editor supports multi-line input. It highlights keywords and comments according to the language property of the StructureCodeSnippetRelation. You can inspect the definition of the input language by CTRL+Left-Click on the chosen language:

This opens the chosen language in the resource editor and allows you to browse the properties such as keywords and style of comments of the language:

By using CTRL+Space in the code snippet editor you can as usual call the Content Assist. The Content Assist will show you all available resources to insert as functions and variables. The set of available resources is defined by the property token on the corresponding StructuredCodeSnippetRelation (see Section10.2). Inserted resources are underlined with blue color.
Consider for example the following meta-model:

Furthermore, we consider a StructuredCodeSnippetRelation on class A with the following definition of tokens:

We can now create a resource a1 of type A and insert code into the code snippet editor. When calling the Content Assist after inserting b1 it proposes the list c1, c2 (available through the Selector B.c) and d1 (available through the Selector B.d). See first screenshot below.
Note that it is also syntactically correct to insert arbitrary strings as identifiers for fields of structs. After inserting one or more such identifiers followed by a '.', the Content Assist will again propose the list of root elements (tokens) independently of possible resources before the string (see second screenshot below).
It is not possible to define structures recursively. Thus, you have to explicitly define the whole structure to the desired (finite) depth if it is self-referential.


The syntax of the input code in the code snippet editor is continuously validated. Syntax errors are shown by underlining the errors in the code and adding an error description to the Model Inconsistencies view:

In this section, we will show how to generate code in an arbitrary target language from code snippets. As explained in the introduction of this chapter, the input code of a code snippet is parsed by a parser that depends on the chosen input language (e.g. C- or Text). From the resulting parse tree, Actifsource generates a model that is composed of temporary resources. The meta-model for parse trees of the language C- is available at http://www.actifsource.com/manuals/index.html. The parse tree for unvalidated input (Text) can be found in Section 10.3.3.
To generate output files from these temporary models, we can apply code templates or template functions to these temporary resources, i.e., the temporary resources behave in exactly the same way as persistent resources except that they are not shown in the resource browser (Project Explorer) and are deleted when the session ends (e.g. the project or the workspace is closed). To use the content of code snippets in templates, you can either use the built-in TemplateFunctions (see Section 10.5.1) or write your own templates or template functions by modifying the built-in templates or writing them from scratch. The behavior of the built-in template functions can be customized by overwriting the way names of variables and functions are created (see Section Overwrite Variable and Function Names (Name Provider) below).
Actifsource provides the following built-in template functions which are defined on resources of type ch.actifsource.codesnippet.metamodel.element.CodeSnippet:
codeSnippetToST: generates Structured Text from a CodeSnippet with input language CMinus or CMinusCondition.codeSnippetToC: generates C code from a CodeSnippet with input language CMinus or CMinusCondition.codeSnippetToText: generates code from a CodeSnippet with input language Text (unvalidated code).codeSnippetToFormattedC: generates formatted C code (HTML) from a CodeSnippet with input language CMinus or CMinusCondition (the actual code is the p)codeSnippetToVHDL: generates VHDL code from a generates C code from a CodeSnippet with input language CMinus or CMinusConditionFor all the above template functions, the names of variables and functions in the output code are generated by calling the function simpleName@BuiltIn on the corresponding resource.
Note that the above template functions which are written for input languages CMinus and CMinusCondition can also be applied to Text. The output is the same as when calling the function codeSnippetToText in this case.
Generating the names of variables and functions by calling simpleName@BuiltIn, is in practice not always sufficient to generate code that meets all the requirements (the requirements on the naming could depend on naming conventions of the target language or names of variables could depend on the context in which the corresponding resource is used). For these cases, Actifsource provides more flexible template functions which takes a Literal of type ch.actifsource.codesnippet.metamodel.parsetree.template.NameProvider as an additional parameter:
codeSnippetToSTwithNameProvider
codeSnippetToCwithNameProvider
codeSnippetToText
codeSnippetToFormattedC
codeSnippetToVHDL
Apart from the generation of function and variable names, these templates have exactly the same behavior as the corresponding template functions from the section above.
The additional parameter to this functions can be used to store additional context information necessary to generate the names and to overwrite the functions used to generate the names, namely variableName@TokenToName and functionName@TokenToName. These two functions take a parameter of type Resource (the resource corresponding to the variable resp. function) and generate the name by calling NameProvider.variableName@TokenToName resp. NameProvider.functionName@TokenToName:


The Code Snippet tutorial available at http://www.actifsource.com/tutorials/index.html show how to implement a NameProvider by guiding you step-by-step through an example.
In general, one can implement and use a NameProvider as follows:
Write a LiteralAspect (e.g. MyNameProviderLiteralAspect) in Java which implements ch.actifsource.core.model.aspects.impl.IGenericLiteralAspect<MyNameProviderLiteralAspect>.

Create your own resource of type Literal (e.g. MyNameProvider) which extends ch.actifsource.codesnippet.metamodel.parsetree.template.NameProvider:

Create a Java interface (e.g. IMyNameProvider) which provides the members needed to manage and store the context information needed by the NameProvider.

Create a FunctionSpace (e.g. MyNameFunctions) which extends TokenToName with a FunctionContext for the newly created Literal type (e.g. MyNameProvider). Create the two functions variableName and functionName with exactly the same signature as corresponding functions in the TokenToName.


Write a JavaFunctions (e.g. createMyNameProvider) that generates an instance of the newly created Java interface (e.g. IMyNameProvider).

In the template where the function to<Language>withNameProvider is used, call the newly created JavaFunction (createMyNameProvider) and call to<Language>withNameProvider with the output of the JavaFunction.

Note that the TemplateFunctions presented in Section 10.5.1 generate the names by internally calling the name functions variableName and functionName on ch.actifsource.codesnippet.metamodel.parsetree.template.NameProvider (the default NameProvider). Thus, overwriting these functions in a FunctionSpace that extends TokenToName for the type NameProvider (see example below) also changes the behavior of this TemplateFunctions without NameProvider (e.g. toC@CodeSnippetToCode). This can, in particular, change the behavior of already existing templates and template functions. Therefore, this approach should normally be avoided and a customized NameProvider implemented instead.

Since the parse trees created from the input code of a code snippet are temporary resources, they are only visible for the code generator. To use the content of code snippets in diagrams, Actifsource provides template functions which allow you to display the code in diagrams:
These TemplateFunctions show the unprocessed code as it is entered by the user in the code snippet editor. Both functions are defined on resources of type
ch.actifsource.codesnippet.metamodel.element.CodeSnippet. An example application of these functions can be found in the Installing Actifsource](/tutorials/\20_enterprise/60_code-snippet) .
| Function | Return type | Description |
|---|---|---|
| rangeOrNull | Class | Returns a Property’s range. |
| →ownerOrNull | Class | Returns a Property’s domain. |
| isComposition | boolean | Check if a Property is an Composition. |
| isDecoratingRelation | boolean | Check if a Property is a DecoratingRelation. |
| isSubRelation | boolean | Checks if a Relation extends another Relation. |
| isComposition | boolean | Checks if a Relation is a Composition. |
| superRelations | Set of Relation | Returns the Relations a Relation extends. |
| subRelations | Set of Relations | Returns the that extend a Relation given Relation. |
| rootProperty | Relation | Returns the first Properties of the Set of Properties a Property extends, including itself. |
| rootRelation | Relation | Returns the first Relations of the Set of Relations a Relation extends, including itself. |
| possibleDecoratingTypes | Map ? | ? |
| Function | Return type | Description |
|---|---|---|
| existsStatement | boolean | ? |
| findNext | Property Set | Returns the successor Statement of a given Statement. |
| nameOf | Attribute Set | Returns the composed simpleName in the form (Subject, Predicate, Object). |
| statementPath | List of Statement | ? |
| decoratedNode | Resource | Returns the Resource that is decorated via this decorating Statement. |
| Function | Return type | Description |
|---|---|---|
| instances | Set of Resource | Returns the direct or indirect instances of a Class. |
| directInstances | Set of Resource | Returns the direct instances of a Class. |
| instancesWithPackage | Set of Resource | Returns the direct or indirect instances of a Class in all Packages. |
| instancesWithMainPackage | Set of Resource | Returns the direct or indirect instances of a Class with their main Package. |
| isTypeOfFilter | Filter on Resource | Returns a Filter which includes Resources of a given Class. |
| resourceBySimpleNameOrNull | Resource with Package | Returns the Instance having a given simple Name. |
| resourcesBySimpleName | Set of Resource with Package | Returns the Instances having a given simple Name. |
| resourceByFullNameOrNull | Resource with Package | Returns the Instance having a given simple Name. |
| resourcesByFullName | Set of Resource with Package | Returns the Instances having a given simple Name. |
| allowedPropertiesOfType | Set of Property | Returns the (inherited or defined) Properties of a Class. |
| allowedPropertiesOfTypeForRead | Set of Property | Returns the (inherited or defined) Properties of a Class,including the overridden Properties. |
| allowedAttributesOfType | Set of Attribute | Returns the (inherited or defined) Attributes of a Class. |
| allowedAttributesOfTypeForRead | Set of Attribute | Returns the (inherited or defined) Attributes of a Class, including the overridden Attributes. |
| allowedRelationsOfType | Set of Attribute | Returns the (inherited or defined) Relations of a Class. |
| allowedRelationsOfTypeForRead | Set of Attribute | Returns the (inherited or defined) Relations of a Class, including overridden Relations. |
| isAbstractClass | boolean | Checks if a Class is abstract. |
| isFinalClass | boolean | Checks if a Class is final. |
| isSubclass | Set of Type | Checks if a Class extends another Class. |
| subclasses | Set of Resource with Package | Returns the Sub-Classes of a given Class. |
| superclasses | Set of Resource with Package | Returns the Super-Classes of a given Class. |
| matchingInstances | Set of Type | ? |
| isMatchingObjectFilter | Filter on Resource | ? |
| matchingSuperTypes | Set of Type | ? |
| matchingSubTypes | Set of Type | ? |
| isMatchingSuperType | boolean | ? |
| rangeToType | Set of Type | ? |
| Function | Return type | Description |
|---|---|---|
| exists | boolean | ? |
| packages | Relation Set | ? |
| mainPackage | Relation Set | ? |
| asPackagedResource | Resource with Package | Decorate a Resource by its main Package. |
| asPackagedResource | Set of Resource with Package | Decorate a Set of Resources by their main Packages. ? |
| namespace | string | Returns the name of the Packages and owning Resources, concatenated with dot. |
| simpleName | string | Returns the Name of a Resource defined by the NameAspect, or else the GUID. |
| hasName | boolean | Checks if a Resource has a Name, that is it has a NameAspect defined. |
| hasModifiableName | boolean | ERROR |
| fullName | boolean | Returns the Name, predeeded by Package Names and Name of the owner Resources. |
| isOwned | boolean | Checks if a Resource is directly or indirectly owned by another Resource, or it is the same Resource. |
| isRootResource | boolean | Checks if a Resource is not owned by any other Resource. |
| isAllowedPredicate | boolean | ? |
| rootResource | Resource | Returns the owner Resource that directly resides in a Package. |
| rootStatements | Statement | ? |
| directlyOwnedResources | Set of Resource | ? |
| ownStatementOrNull | Statement | Returns the Statement stating that a given Resource is owned by another Resource. |
| decoratedNode | Resource | Returns the Resource being decorated by this Decorator. |
| shallowType | Type | Returns the direct Type of a Resource. |
| isTypeOf | boolean | Check if a Resource is instance of a given Class. |
| toMeRelationsForType | Relation | ? |
| toMeTypes | Set of Type | ? |
| isMatching | boolean | ? |
| matchingTypes | Set of Type | ? |
| allowedProperties | Property Set | Returns the (inherited or defined) Properties of a Resource’s Class. |
| allowedPropertiesForRead | Property Set | Returns the (inherited or defined) Properties of a Resource’s Class,including overridden Properties. |
| allowedAttributes | Attribute Set | Returns the (inherited or defined) Attributes of a Resource’s Class. |
| allowedAttributesForRead | Attribute Set | Returns the (inherited or defined) Attributes of a Resource’s Class, including overridden Attributes. |
| allowedRelations | Relation Set Returns the (inherited or defined) Relations of a Resource’s Class. | |
| allowedRelationsForRead | Relation Set | Returns the (inherited or defined) Relations of a Resource’s Class, including overridden Relations. |
| allowedToMeRelations | Relation Set | Returns the Relations having a Resource’s Class as range. |
| Function | Return type | Description |
|---|---|---|
| isAbstractExtendable | boolean | Checks if an Extendable is abstract. |
| isFinalExtendable | boolean | Checks if an Extendable is final. |
| extensions | Set of Extendable | Returns the extending Resources. |
| extendedResource | Set of Extendable | Returns the extended Resources. |
| isExtension | boolean | Check if a Resource extends another Resource. |
| Function | Return type | Description |
|---|---|---|
| attributeStatementOrNull | Statement | ? |
| allowedPropertiesForRead | Property Set | Returns the (inherited or defined) Properties of a Resource’s Class, including overridden Properties. |
| allowedAttributes | Attribute Set | Returns the (inherited or defined) Attributes of a Resource’s Class. |
| allowedAttributesForRead | Attribute Set | Returns the (inherited or defined) Attributes of a Resource’s Class, including overridden Attributes. |
| allowedRelations | Relation Set | Returns the (inherited or defined) Relations of a Resource’s Class. |
| allowedRelationsForRead | Relation Set | Returns the (inherited or defined) Relations of a Resource’s Class, including overridden Relations. |
| allowedToMeRelations | Relation Set | Returns the Relations having a Resource’s Class as range. |
| objectsForAttribute | List of Any | Returns the Objects as result of the Evaluation of a given Attribute on a given Resource |
| objectForAttribute | List of Any | Returns the first Objects as result of the Evaluation of a given Attribute on a given Resource, or else a default. |
| objectForAttributeOrNull | List of Any | Returns the first Objects as result of the Evaluation of a given Attribute on a given Resource. |
| statementForAttributeOrNull | List of Statements | Returns the first Statement on a given Resource for a given Attribute. |
| objectForPropertyOrNull | List of Objects | Returns the first Objects as result of the Evaluation of a given Property on a given Resource. |
| objectMaxCard | int | Returns the maximum allowed count of Statement of a given Relation for a Resource in the Relation’s range. |
| objectMinCard | int | Returns the minimum allowed count of Statement of a given Relation for a Resource in the Relation’s range. |
| attributeMinCard | int | Returns the minimum allowed count of Statement of a given Attribute for a Resource in the Attribute’s domain. |
| attributeMaxCard | int | Returns the minimum allowed count of Statement of a given Attribute for a Resource in the Attribute’s domain. |
| subjectMinCard | int | Returns the minimum allowed count of Statement of a given Relation for a Resource in the Property’s domain. |
| subjectMaxCard | int | Returns the minimum allowed count of Statement of a given Relation for a Resource in the Property’s domain. |
| objectForAttributeOrNull | List of Literal | Returns the first Objects as result of the Evaluation of a given Attribute on a given Resource. |
| valueForAttributeOrNull | string | Returns the string value of the first Object as result of the Evaluation of a given Attribute on a given Resource. |
| valueForBooleanAttribute | boolean | Returns the string value of the first Object as result of the Evaluation of a given Attribute on a given Resource, or a default value. |
| objectForRelationOrNull | List of Resource | Returns the first Objects as result of the Evaluation of a given Relation on a given Resource. |
| objectsForRelation | List of Resource | Returns the Objects as result of the Evaluation of a given Relation on a given Resource. |
| objectsForRelationOfType | List of Resource | Returns the Objects as result of the Evaluation of a given Relation on a given Resource, having a given Type. |
| ownerOrNull | Resource | Returns a Resource’s owner Resource. |
| relationStatementOrNull | Statement | ? |
| statementOrNull | Statement | Returns the Statement with given Subject, Predicate and Object. |
| statement | Set of Statement | Returns the Statements with given Subject. |
| statementsForAttribute | Set of Statement | Returns the Statements with Subject and Predicate given by Resource and Attribute. |
| statementsForRelation | Set of Statement | Returns the Statements with Subject and Predicate given by Resource and Relation. |
| statementForRelationOrNull | Set of Statement | Returns the first Statement with Subject and Predicate given by Resource and Relation. |
| subjectForRelationOrNull | Set of Object | Returns the first Subject with Statement and Predicate given by Resource and Relation. |
| subjectsForRelation | Set of Statement | Returns the Subjects with Object and Predicate given by Resource and Relation. |
| toMeStatementForRelationOrNull | Set of Statement | Returns the first Statement with Object and Predicate given by Resource and Relation. |
| toMeStatementsForAttribute | Set of Statement | Returns the Statements with Object and Predicate given by Resource and Attribute. |
| toMeStatementsForRelation | Set of Statement | Returns the Statements with Object and Predicate given by Resource and Relation. |
| toMeStatements | Set of Statement | Returns the first Statement with given Object. |
| treeSelectObjects | Set of Object | Calculates the closure for given Resource and Relation. ?? |
| topoSelectObjects | Set of Object | ? |
| treeSelectSubjects | Set of Object | ? |
| decoratableNodes | Set of Resource | ? |
| Function | Return type | Description |
|---|---|---|
| allReferencedPackages | Package | ? |
| allStatements | Set of Statement | Returns all the Statements in a Package. |
| allRequiredScopes | Set of Statement | ? |
| allAvailableRequiredScopes | Set of Resource Scope | ? |
| resourceByNameOrNull | Resource | Returns the Resource in the Package having a given simple Name. |
| Function | Return type | Description |
|---|---|---|
| getScope | Resource Scope | Returns the Scope. |
| isRequired | Set of Resource Scope | ? |
| allResourcesInScope | Unordered Set of Resource | Returns all Resources reachable from a given Resource Scope. |
| allReferencedResourcesInScope | Unordered Set of Resource | ? |
| classByName | Java class | Loads a Java class of given name. |
| classByNameOrNull | Java class | Loads a Java class of given name. |
| packagesInScope | Set of Package | ? |
| unreferencedResource | Set of Resource with Package | ? |
| types | Set of Class | Returns the direct and indirect Types of a Resource. |
| Function | Return type | Description |
|---|---|---|
| getScope | Resource Scope | Returns the Scope. |
| getRequiredScopes | Set of Resource Scope | ? |
| allRequiredScopes | Set of Resource Scope | ? |
| allAvailableRequiredScopes | Set of Resource Scope | ? |
| isRequired | Set of Resource Scope | ? |
| allResources | Unordered Set of Resource | Returns all Resources in Scope. |
| allResourcesInPackage | Unordered Set of Resource | Unordered Set of Resource |
| allResourcesInPackage2 | Unordered Set of Resource with Package | Returns all Resources in a Package. |
| allResourcesInPackages2 | Unordered Set of Resource with Package | Returns all Resources in a List of Packages. |
| allRootResourcesInPackage | Unordered Set of Resource | Returns all Resources residing directly in a Package. |
| allStatements | Set of Statement Returns all Statements. | |
| resourceBySimpleNameOrNull | Resource with Package | Returns the Resource having a given simple Name. |
| resourcesBySimpleName | Set of Resource with Package | Returns the Resource having a given simple Name. |
| resourceByFullNameOrNull | Resource with Package | Returns the Resource having a given full Name. |
| resourcesByFullName | Set of Resource with Package | Returns the Resource having a given full Name. |
| packagesByName | Set of Package | Returns the Packages having a given Name. |
| subPackagesByName | Set of Package | Returns the Packages having a given Name, including the Sub-Packages. |
| packagesByExpressions | Iterable of Package | ? |
| allPackages | Iterable of Package | ? |
In this section we will show how to set up the context sensitive help system. The Actifsource context sensitive help is integrated into the Eclipse Platform help system.
As a very simple example, let us define a help system for the following meta-model. This example allows to show help information about the Class A, B and BaseAB, and the respective instances A1 and B1.
First, we create the help file “ClassDocument.html” which contains all the help information and which defines the link targets for the context sensitive help.


The table of contents (toc) contains a collection of topics for display inside the Eclipse help system. The topics here unlike in the context sensitive help are not bound to a context. For the detailed information on the supported features (Topics, Link and Anchor), see the Eclipse documentation
Now we create a HelpSystem resource in Actifsource: “ExampleHelpSystem”. Let us add a table of contents which has its contents statically defined as xml file: “StaticTableOfContents”. It has two properties:

For editing the toc xml file, you can use the Eclipse specific editor, or edit it directly in an xml editor.
The toc xml file consist of a root xml element “toc” having an attribute “label” and containing nested “topic” elements. A “topic” element has the two xml attributes:
Now we create a toc file (TableOfContentsFile.xml) with the following topics and nested topics.


To open the Eclipse help system choose Help -> Help Contents. Select the ‘Actifsource Help Sample’ and expand the topics and you will see the following.

Context sensitive help is a mechanism for linking a Resource to a specific help topic. For the detailed information on the supported features (Context, Topics and Commands), see the Eclipse documentation.

The information, which defines the different contexts and how they are linked to a topic, is stored in a help context xml file. When triggering the context sensitive help, the defined contexts are matched against the currently selected resource in the following order (most specific to least specific):
You can edit the help context xml file directly or you using the Eclipse specific editor. A context xml entry has the two attributes:
A topic entry in the xml file has the attributes:
Now we create a help context file (HelpContextfile.xml) with the following contexts and topics.


The content sensitive help can be opened by selecting a Resource via any Actifsource editor and pressing ‘F1’.
All related topics started from the selected Resource (A1) via his types (from specific to generic type) are merged together. If only a single context matches the currently selected resource (setting the “merge” flag to false), then the html content is immediately shown inside the Eclipse help view.

In this section we will show how to export any build config to the file system. As a very simple example, let us define a generic template wizard to export the build config ‘TestBuildConfig’.

| Property | Description |
|---|---|
| name | Defines the export wizard name. |
| version | Defines the version from the export wizard. |
| publisher | Defines the publisher from the export wizard. |
| description | Defines the description inside the eclipse info page. Html tags are allowed. |
| info | Defines the info inside the export wizard. |
| buildConfig | Defines the build config to export. |
You can start the export sequence via the context menu in the project explorer.

Select the generic export wizard to continue the export.

Select the Test-Generic-Template-Wizard to continue the export.

Preselecting a project scope and output folder inside the workspace or file system to complete the exporting sequence.

After importing any errors and infos are shown in the info-Page.

Click on GUID
Eclipse Builder
Working with GCC
Manual Actifsource VsCode Extension coming soon.
The actifsoruce installation in eclipse is described under installation.
The Actifsource extension is installed via the Visual Studio Marketplace.
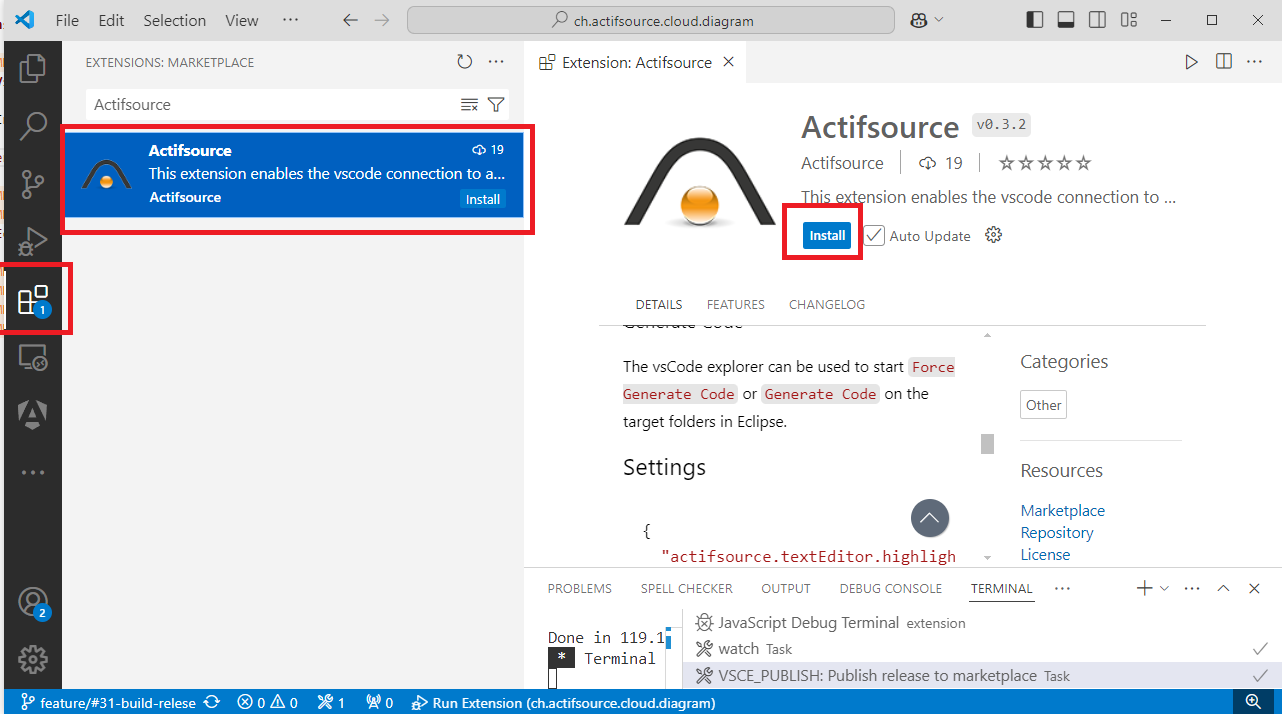
The following points describe how to set up a workspace:
Windows->Preferences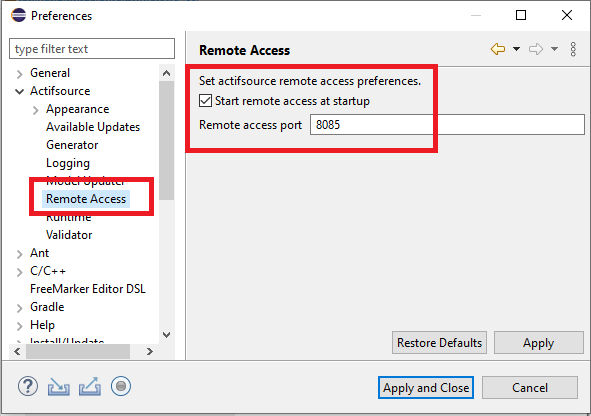
Open Folder..vscode/settings.json:{
"actifsource": {
"resourceAccess": {
"host": "localhost",
"port": "8085",
"autoConnect": true,
},
},
}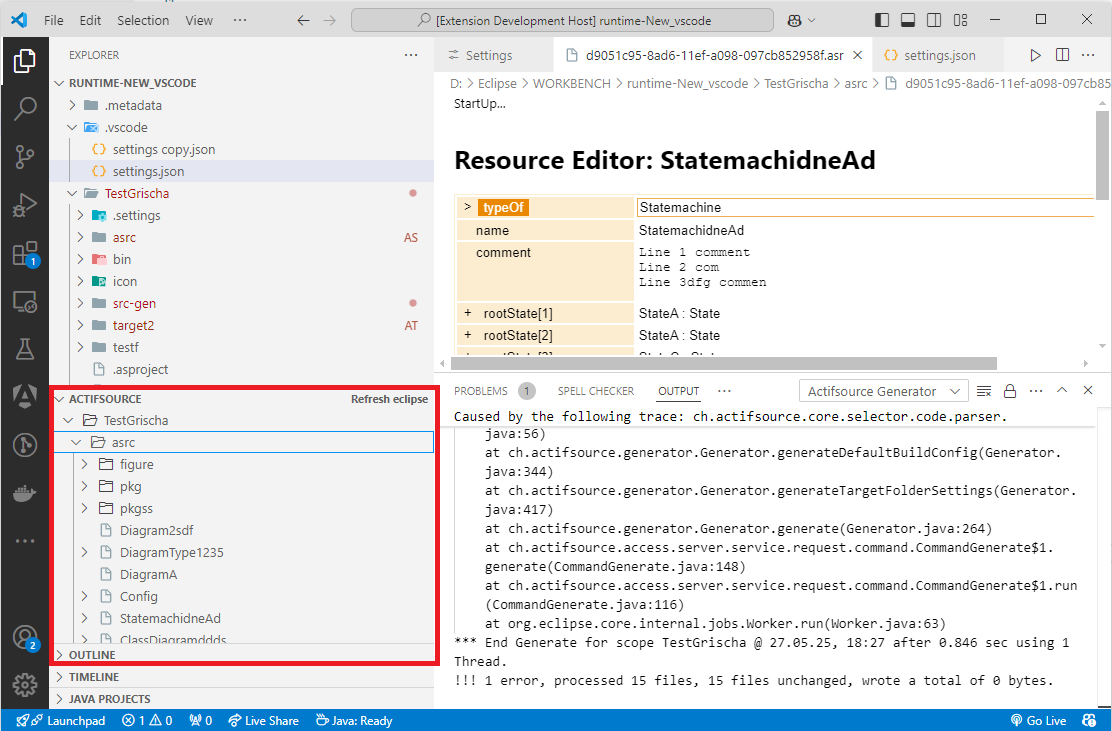
All tutorials can be downloaded from: github.com/actifsource/ch.actifsource.tutorials .
Learn how to install the Actifsource Plugin for Eclipse and how to activate your license. more…
Learn to design a generic domain, write code templates and generate code. more…
Develop complex templates with template interdependencies. Use Java Functions from within templates. more…
Develop a fully typed state machine model. Learn about decorating relations and range restrictions to ease the use of the specific domain model. more…
Enabling syntax highlighting for any programming language more…
Writing Java validation aspects for user defined literal types. more…
Writing an aspect for refactoring model instances based on meta model changes. more…
Learn how to create an eclipse plugin containing an Actifsource builtin model. more…
Learn about JavaListFunctions. Create your own JavaListFunction to sort resources. more…
![]()
| Tutorial | Actifsource Tutorial – Installing Actifsource |
|---|---|
| Required Time | - 10 Minutes |
| Prerequisites | - Download and install Java - Download and install Eclipse |
| Goal | - Installing actifsource as a Eclipse Plugin |
| Topics covered | - Install the actifsource Plugin - Switch to the actifsource Perspective |
| Notation | $\hookrightarrow$ To do $\hookrightarrow$ Information • Bold: Terms from actifsource or other technologies and tools • Bold underlined: actifsource Resources • Monospaced: User input• Italics: Important terms in current situation |
| Disclaimer | The authors do not accept any liability arising out of the application or use of any information or equipment described herein. The information contained within this document is by its very nature incomplete. Therefore the authors accept no responsibility for the precise accuracy of the documentation contained herein. It should be used rather as a guide and starting point. |
| Contact | Actifsource AG Täfernstrasse 37 5405 Baden-Dättwil Switzerland www.actifsource.com |
| Trademark | Actifsource is a registered trademark of Actifsource AG in Switzerland, the EU, USA, and China. other names appearing on the site may be trademarks of their respective owners. |
Actifsource is realized as an Eclipse Plugin
For more information about eclipse see also wikipedia (Eclipse (software))

From the menu Help select Install New Software...

Click Add...
Enter Name: actifsource
Enter Location: https://www.actifsource.com/updates or the given update site
Click OK


![]()
| Tutorial | Actifsource Tutorial – Simple Service |
|---|---|
| Required Time | • 70 Minutes |
| Prerequisites | • Actifsource Tutorial – Installing Actifsource |
| Goal | • Developing a generic domain model for a simple service infrastructure • Instantiating specific domain objects according to the generic domain • Writing code templates according to the generic domain • Generate code for every specific domain object |
| Topics covered | • Creating a new actifsource project • Working with Diagram/Resource and Template Editor • Generating Code |
| Notation | ↪ To do ⓘ Information • Bold: Terms from actifsource or other technologies and tools • Bold underlined: actifsource Resources • Monospaced: User input• Italics: Important terms in current situation |
| Disclaimer | The authors do not accept any liability arising out of the application or use of any information or equipment described herein. The information contained within this document is by its very nature incomplete. Therefore the authors accept no responsibility for the precise accuracy of the documentation contained herein. It should be used rather as a guide and starting point. |
| Contact | Actifsource AG Täfernstrasse 37 5405 Baden-Dättwil Switzerland www.actifsource.com |
| Trademark | Actifsource is a registered trademark of Actifsource AG in Switzerland, the EU, USA, and China. Other names appearing on the site may be trademarks of their respective owners. |
| Compatibility | Created with actifsource Version 5.8.5 |

…


↪ Install Actifsource as a plugin from www.actifsource.com/
↪ Open the actifsource Perspective

↪ In the Open Perspective dialog click on Actifsource
↪ Click OK to confirm.

ⓘ Make sure the actifsource Perspective is activated

↪ Create a new actifsource Project

↪ Choose the project’s name com.actifsource.simpleservice
↪ Click Next


↪ Switch to the tab Target Folders
↪ Click Add Target Folder…


↪ Add a target folder named src

↪ Click Finish


↪ Create a new Package in the resource folder asrc

↪ Name your package com.actifsource.simpleservice.generic as shown above
↪ Click Finish

↪ Change the style for Package Presentation as you like

↪ Start with a Class Diagram of your generic domain model
↪ Create a new Class Diagram in the Package generic

↪ Name your Diagram ServiceDesign
↪ Click Finish

↪ Insert the following Classes using the New Class Tool from the Palette: Service, Call, Parameter and Type

↪ Specify the Relations between your Classes using the Relation Tool from the Palette on the right
↪ First, link Service and Call by clicking on Service and then on Call in the diagram

↪ Select the Composition

↪ Insert another Composition between Call and Parameter

↪ Insert a Association between Parameter and Type
↪ Name the relation type


↪ Insert a Association between Call and Type

↪ Name the relation returnType
↪ Choose SubjectCardinality 1..1 since we always want a return type in this example
↪ Click Ok

↪ Adjust the subjectCardinality of the call Relation

↪ Change the subjectCardinality from Cardinality0_N to Cardinality1_N
↪ Use Content Assist (Ctrl+Space) and select the desired Cardinality

↪ Make sure to change all marked cardinalities as shown above
↪ Choose subjectCardinality Cardinality1_1 for the relations type and returnType

↪ Create a new Package com.actifsource.simpleservice.specific in simpleservice

↪ Select the Package specific
↪ Use the New Resource Tool to create a Resource of type Service

↪ Name the Service Patient
↪ Click Finish


↪ Use the context menu on the Relation call to explore your options
↪ Press Enter to create a Resource of type Call for the Patient Service


↪ Enter the name Create by pressing enter on name or use the context menu
↪ Enter a new Parameter by pressing enter on parameter or use the context menu
↪ Enter the name LastName of the created Parameter

↪ Activate Content Assist (Ctrl+Space) to insert a Resource of type Type
↪ Create a new Type String using Content Assist (Ctrl+Space)

↪ Name the new Type String
↪ Switch back to the Service Patient by clicking the Patient Tab or by pressing Alt+Left to navigate to the last edit location


↪ Select parameter
↪ Insert a new Parameter using Insert After (Ctrl+Enter) or Insert Before (Alt+Shift+Enter)

↪ Name the Parameter FirstName
↪ Insert the already created Type String using Content Assist (Ctrl+Space)

↪ For returnType create a new Type int using Content Assist (Ctrl+Space)

↪ Select call
↪ Insert a new Call using Insert After (Ctrl+Enter) or Insert Before (Alt+Shift+Enter)

↪ Edit the Call Delete as shown above
↪ Insert Parameter Id of Type int
↪ Insert returnType boolean

↪ Create a new Package types in generic
↪ Move the Types boolean, int and String into the Package types using drag & drop

↪ Activate Link with Editor
 to link the Project Explorer with the editor

↪ Create a new Package com.actifsource.simpleservice.template in simpleservice

↪ Select the Resource Service
↪ Choose New Template from the context menu

↪ Choose the Package template using Content Assist (Ctrl+Space)

↪ Name the template ServiceImpl
↪ Click Finish


↪ Place the cursor on the Filename Line
↪ Use Content Assist (Ctrl+Space) to insert a Variable
↪ Choose the Resource Service

↪ Press ‘. ’ (dot) after Service
↪ Content Assist opens automatically.
↪ Press Ctrl+Space to reopen Content Assist manually
↪ Select the Attribut name for Service

↪ Add the postfix Impl to the file name
↪ Add the language extension .java to the file name
↪ Save the file → a new file in your Target Folder src is created

↪ Write a Java Class as shown above. Make sure the class name contains the Variable Service.name
↪ Use Content Assist (Ctrl+Space) to insert the Variable
↪ Or use Copy/Paste (Ctrl+C/Ctrl+V) to copy the class name from file name
↪ Save the file (Ctrl+S) → Generated code can be found in the target folder src

↪ Place the cursor in the class body
↪ Use the tool Insert Line Context (Alt+Insert) from the tool bar

↪ Attach the Sub Context to the Parent Context using the Selector
↪ The given Selector must therefore navigate from Service to Call using Service.call
↪ Use Content Assist (Ctrl+Space) to specify the Selector
↪ Press Enter in the Selector to return to code

↪ Write a function in the Call Context as shown above

↪ Place cursor between the brackets
↪ Use the tool Insert Column Context (Alt+Shift+Insert) from the tool bar

↪ Write a parameter list in the Parameter Context as shown above
↪ Don’t forget the ‘, ’ (Comma) at the end
↪ Save the file (Ctrl+S). The generated file should contain a Java class , its methods and parameters


↪ Select both the comma and the following space
↪ Choose Not Last (Alt+3) from the tool bar
↪ Save the file (Ctrl+S). The generated file should contain a class , its methods and parameters

↪ Place cursor in the function body
↪ Insert a Protected Context in the function body with the tool shown above

↪ Write any text in the Protected Context, e.g. a TODO comment
Note that Call is translated in Call. Tip: Rename Call to ServiceCall to find out why this makes sense
You must not delete the Tags Begin Protected Region and End Protected Region
Alter the template code. Save the template. See what happens with the Protected Regions
![]()
| Tutorial | Actifsource Tutorial – Complex Service |
|---|---|
| Required Time | - 60 Minutes |
| Prerequisites | - Actifsource Tutorial – Installing Actifsource - Actifsource Tutorial – Simple Service |
| Goal | - Use Java Functions to reuse text fragments in your templates and capture complex expressions to keep your templates clean and easy to read |
- Use Function Spaces to keep Java Functions organized |
|
| Topics covered | - - Extracting Java Functions from template code - Editing Java Functions - Advanced Template Editor Context Operations - Functions Spaces and Template Functions - Built-in Java Functions - Place generated code in specific folders - Copy with Context |
| Notation | ↪ To do ⓘ Information • Bold: Terms from actifsource or other technologies and tools • Bold underlined: actifsource Resources • Monospaced: User input• Italics: Important terms in current situation |
| Disclaimer | The authors do not accept any liability arising out of the application or use of any information or equipment described herein. The information contained within this document is by its very nature incomplete. Therefore the authors accept no responsibility for the precise accuracy of the documentation contained herein. It should be used rather as a guide and starting point. |
| Contact | Actifsource AG Täfernstrasse 37 5405 Baden-Dättwil Switzerland www.actifsource.com |
| Trademark | Actifsource is a registered trademark of Actifsource AG in Switzerland, the EU, USA, and China. other names appearing on the site may be trademarks of their respective owners. |
Prepare a new actifsource Project as seen in the Actifsource Tutorial – Simple Service
Learn how to extract Java Functions from template code to cope with
complex situations

Edit Java Functions
Learn about advanced Context Operations in the Template Editor
Learn about Function Spaces and how to place functions
Use built-in functions

Generate code for specific folders
Copy template code with its Context
Prepare a new actifsource Project as seen in the Actifsource Tutorial – Simple Service
Setup the Target Folder src
Create a Generic Domain Model
Create a Specific Domain Model
Create a Code Template
Use the following package structure


Create a Generic Domain Model in the DiagramEditor named ServiceDesign in the Package generic
The Design shall contain the following Domain Classes
Insert a Composition between
Service and Call
Call and Parameter
Insert a Association between
Call and Type
Parameter and Type
Adjust the Cardinalities as shown above
Warning: The layout for the relations transition and targetState might differ in your editor

Create a Service named Patient in the Package specific
Add the Calls Create and Delete
Add the Parameter LastName, FirstName and Id as shown above
Add the returnTypes as shown above

Create a Code Template named ServiceImpl in the Package template
Write code as shown above
The function shall be placed in the Context Call Selector is Service.call
The function parameters shall be placed in the Context Parameter; Selector is Call.parameter
Save the Code Template

Use Java Functions to
extract recurring text fragments from your templates
capture complex expressions to keep your templates clean and easy to read
Use Java Classes generated from your Generic Domain Model to write and maintain complex Java Functions

Note that the term Service.name_Impl is used twice


Note that actifsource generates a select method for each property of the corresponding class in the Generic Domain Model. You may use these methods to traverse your Generic Domain Model using the respective selectPROPERTY() methods in your Java Functions


Note that the corresponding Context Bar is highlighted


Note that a new Call Context (Selector: Service.call) has been added


Note that the default Function Space for this new function is the Template ServiceImpl


Note that the Function Space has been changed from ServiceImpl to CallImpl


Note that className is the Function which we extracted in the template ServiceImpl before


Generated artifacts are placed in the Target Folder of your project
You may want to place generated artifacts in specific sub folders
Add Service.name/ as folder information in the file line of the Template ServiceImpl as shown above


Note also the shortcuts Alt+PageUp to select the parent context, and Ctrl+C to copy a context


![]()
| Tutorial | Actifsource Tutorial – State Machine |
|---|---|
| Required Time | - 40 Minutes |
| Prerequisites | - Actifsource Tutorial – Installing Actifsource - Actifsource Tutorial – Simple Service - Actifsource Tutorial – Complex Service |
| Goal | - Developing an easy to use state machine model - Show possible events in every transition - Restrict transition target to state instances of the own state machine |
| Topics covered | - Decorating Relation Aspect - Range Restriction Aspect - Selector (forward and reverse selection) |
| Notation | ↪ To do ⓘ Information • Bold: Terms from actifsource or other technologies and tools • Bold underlined: actifsource Resources • Monospaced: User input• Italics: Important terms in current situation |
| Disclaimer | The authors do not accept any liability arising out of the application or use of any information or equipment described herein. The information contained within this document is by its very nature incomplete. Therefore the authors accept no responsibility for the precise accuracy of the documentation contained herein. It should be used rather as a guide and starting point. |
| Contact | Actifsource AG Täfernstrasse 37 5405 Baden-Dättwil Switzerland www.actifsource.com |
| Trademark | Actifsource is a registered trademark of Actifsource AG in Switzerland, the EU, USA, and China. other names appearing on the site may be trademarks of their respective owners. |


ch.actifsource.tutorial.statemachine as seen in the Actifsource Tutorial Simple Service


Insert a Composition between
Insert a Association between
Adjust the Cardinalities as shown above
Warning: The layout for the relations transition and targetState might differ in your editor


Note that you can choose between a JavaAspectImplementation and a SelectorAspectImplementation


Note that State.–state navigates backwards from State to Statemachine

Implementing a DecoratingRelationAspect asks for a subclass of Decorator
Decorator has a useRelation target which is used to store the specific decorating Resource
Open Quick Assist by clicking the light bulb or press Ctrl+1


Note that the Association target has been added in the Design Diagram automatically

Note there is a decoratingRelation transition for every Event

Note that the relation target has been completed automatically with the specific decorating Event start


Note that all instances of State are listened instead of just the ones from Statemachine2

In Transition open the useRelation targetState
Press Enter on aspect[RangeRestrictionAspect]

Note that you can choose between a JavaAspectImplementation and a SelectorAspectImplementation

Let's restrict the range of targetState to instances of States owned by the own Statemachine
The useRelation targetState is found in Transition
We have to navigate from Transition to all States of the Statemachine

Transition.-transition.-state.state using Content Assist (Ctrl+Space)

Note that only instances of State from Statemachine2 are listed


ch.actifsource.tutorial.statemachine.template


Next, we define an enumeration variable with the all the States of a Statemachine as enumerators. This variable stores the current state of a Statemachine

We define a member function for each event of our Statemachine which will later handle all the possible transitions triggered by the event:

We write a switch-statement with the current state m_aState as control variable and define a LineContext that iterates over all
Transitions referring to an Event through the relation Transition.event
m_aState as control variable

We create a LineContext that iterates over all States that refer to a Transition through the relation State.transition

We write a case-statement for each State that is (indirectly) referring to an Event through State.transition.event

We update the current state as follows: We first select for an Event the Transitions that refer to the Event trough Transition.event For each
Transition we select the States that are connected to Transition by State.transition
For each State it holds that if the current state m_aState is equal to State then the new State of the Statemachine is Transition.targetState

In order to generate code from the template we have implemented before, we setup the project properties for Actifsource:


Enter src as Folder Name in the New Folder dialog
Click on OK in the New Folder dialog and then in the Select Target Folder dialog


The code generator now applies the template StatemachineImpl to the two Statemachine instances and stores the resulting files to the src folder:
src folder and check that the two files Statemachine1Impl.hpp and Statemachine2Impl.hpp have been generated
![]()
| Tutorial | Actifsource Tutorial – Language |
|---|---|
| Required Time | - 15 Minutes |
| Prerequisites | - Actifsource Tutorial – Installing Actifsource - Actifsource Tutorial – Simple Service |
| Goal | - Enabling syntax highlighting for any programming language |
| Topics covered | - Create a new Language - Use the new Language |
| Notation | ↪ To do ⓘ Information • Bold: Terms from actifsource or other technologies and tools • Bold underlined: actifsource Resources • Monospaced: User input• Italics: Important terms in current situation |
| Disclaimer | The authors do not accept any liability arising out of the application or use of any information or equipment described herein. The information contained within this document is by its very nature incomplete. Therefore the authors accept no responsibility for the precise accuracy of the documentation contained herein. It should be used rather as a guide and starting point. |
| Contact | Actifsource AG Täfernstrasse 37 5405 Baden-Dättwil Switzerland www.actifsource.com |
| Trademark | Actifsource is a registered trademark of Actifsource AG in Switzerland, the EU, USA, and China. other names appearing on the site may be trademarks of their respective owners. |

ch.actifsource.tutorial.language as seen in the Actifsource Tutorial Simple ServiceInstances of Language describe the following language elements
Let’s create an new Language instance for a fictitious math language


Name the Language Math
Click Finish


.math

![]()
| Tutorial | Actifsource Tutorial – Literal Aspect |
|---|---|
| Required Time | - 30 Minutes |
| Prerequisites | - Actifsource Tutorial – Installing Actifsource - Actifsource Tutorial – Simple Service |
| Goal | - Writing an aspect for custom literal types - Validate custom literals |
| Topics covered | - Create a simple demo model - Add a new Literal - Implement the Literal Aspect - Using the Literal Aspect |
| Notation | ↪ To do ⓘ Information • Bold: Terms from actifsource or other technologies and tools • Bold underlined: actifsource Resources • Monospaced: User input• Italics: Important terms in current situation |
| Disclaimer | The authors do not accept any liability arising out of the application or use of any information or equipment described herein. The information contained within this document is by its very nature incomplete. Therefore the authors accept no responsibility for the precise accuracy of the documentation contained herein. It should be used rather as a guide and starting point. |
| Contact | Actifsource AG Täfernstrasse 37 5405 Baden-Dättwil Switzerland www.actifsource.com |
| Trademark | Actifsource is a registered trademark of Actifsource AG in Switzerland, the EU, USA, and China. other names appearing on the site may be trademarks of their respective owners. |


ch.actifsource.tutorial.literal.aspect as shown in this tutorial

DateLiteral

ch.actifsource.tutorial.literal.aspect in the navigator to open the context menu.Note that eclipse allows a project to be an actifsource project and a Eclipse Plugin project at the same time.


MANIFEST.MF


srcch.actifsource.tutorial.literal.aspect.ILiteralAspect.

package ch.actifsource.tutorial.literal.aspect;

import java.text.DateFormat;
import java.text.ParseException;
import java.util.Date;
import java.util.Locale;

import javax.annotation.CheckForNull;


import ch.actifsource.core.INode;
import ch.actifsource.core.job.IReadJobExecutor;
import ch.actifsource.core.model.aspects.ILiteralAspect;
import ch.actifsource.core.scope.IResourceScope;

public class DateLiteral implements ILiteralAspect {

  @Override
  public boolean allowMultiline() {
    return false;
  }

  @Override
  public @CheckForNull Object getValue(IReadJobExecutor executor, IResourceScope arg1, INode value) {
    DateFormat dateInstance = DateFormat.getDateInstance(DateFormat.LONG, Locale.ENGLISH);
    try {
      return dateInstance.parse(value.toString());
    } catch (ParseException e) {
      return null;
    }
  }

  @Override
  public Class<?> getValueType() {
    return Date.class;
  }

  @Override
  public @CheckForNull String isValid(IReadJobExecutor executor, IResourceScope scope, String value) {
    DateFormat dateInstance = DateFormat.getDateInstance(DateFormat.LONG, Locale.ENGLISH);
    try {
      dateInstance.parse(value.toString());
      return null;
    } catch (ParseException e) {
      return e.getMessage();
    }
  }

}


![]()
| Tutorial | Actifsource Tutorial – Refactoring |
|---|---|
| Required Time | - 45 Minutes |
| Prerequisites | - Actifsource Tutorial – Installing Actifsource - Actifsource Tutorial – Simple Service |
| Goal | - Writing an aspect for refactoring instances - Refactor instances to match the new specification literals - Update templates |
| Topics covered | - Create and register a refactoring aspect - Update the simple service model - Execute a refactoring - Update the templates |
| Notation | ↪ To do ⓘ Information • Bold: Terms from actifsource or other technologies and tools • Bold underlined: actifsource Resources • Monospaced: User input• Italics: Important terms in current situation |
| Disclaimer | The authors do not accept any liability arising out of the application or use of any information or equipment described herein. The information contained within this document is by its very nature incomplete. Therefore the authors accept no responsibility for the precise accuracy of the documentation contained herein. It should be used rather as a guide and starting point. |
| Contact | Actifsource AG Täfernstrasse 37 5405 Baden-Dättwil Switzerland www.actifsource.com |
| Trademark | Actifsource is a registered trademark of Actifsource AG in Switzerland, the EU, USA, and China. other names appearing on the site may be trademarks of their respective owners. |


ch.actifsource.tutorial.refactoring as shown in this tutorialch.actifsource.ui.refactoring.Refactoring with name Refactoring

ch.actifsource.tutorial.builtin in the navigator to open the context menu.


MANIFEST.MF


src-aspect


public CallGroupRefactoringAspect() {
  super("1.0.0",
        Date.from(LocalDate.of(2024, 1, 6).atStartOfDay(ZoneId.systemDefault()).toInstant()),
        "Call to Callgroup");
}


group with a new Class named “CallGroup” used as the range


async of type boolean with default value false

ch.actifsource.tutorial.refactoringProperties


src-gen target folder for exporting java classes for the SimpleService packages

-If you cannot use the buildconfig ExportWithoutStatements, check in the Built-in Dependencies tab whether the JAVAMODEL is available. If not, add it via the Add Builtin button.

The refactor method has only two parameters an IModifiable and a list of packages. The modifiable provides the context to access the actifsource resources. The package list contains the actifsource packages selected by the user when starting the refactoring. How the packages selection is interpreted is up to the implementer.
In general you need to use the two classes Select and Update. These are facades providing a convenient way to select and update resource information in a context. To get information about the available methods, open the class and a have a look at the javadoc comments on how to use them.
The actifsource API works with statements and resources. A Statement is a triple connecting two resources (subject, object) through a property (predicate). The subject is the resource whose type (class) defines the predicate (property). The object is an instance of properties range. This is almost the same you see in the resource editor. In our example Patient is an instance of Service Person refers the Call throw the call defined in the Service class. For example you will get a statement Person (subject), call (predicate), Create (object) because Person refers to Create through the call relation. This is different from the diagram editor where subject and object are represented by their type.
The old model looked like this
and the new model looks like this now

The only thing the refactoring has to do is adding a CallGroup into each Service and move the Call into the group.


group. The last parameter defines the default values for the attributes and relations when creating the resource and can be left out. For each property not found in the defaultValue map the default defined in the model will be used.


Call to Callgroup.


You may play around a little bit with the model by adding an additional CallGroup to the Patient with the async attribute set to true.
![]()
| Tutorial | Actifsource Tutorial – Builtin-Models |
|---|---|
| Required Time | - 45 Minutes |
| Prerequisites | - Actifsource Tutorial – Installing Actifsource - Actifsource Tutorial – Simple Service |
| Goal | - Creating an eclipse plugin containing an actifsource builtin model |
| Topics covered | - Create an actifsource project - Convert an actifsource project to a plugin project - Define the exported resource folders - Define a builtin - Create a feature and setup an updatesite - Install the example feature - Using the builtin |
| Notation | ↪ To do ⓘ Information • Bold: Terms from actifsource or other technologies and tools • Bold underlined: actifsource Resources • Monospaced: User input• Italics: Important terms in current situation |
| Disclaimer | The authors do not accept any liability arising out of the application or use of any information or equipment described herein. The information contained within this document is by its very nature incomplete. Therefore the authors accept no responsibility for the precise accuracy of the documentation contained herein. It should be used rather as a guide and starting point. |
| Contact | Actifsource AG Täfernstrasse 37 5405 Baden-Dättwil Switzerland www.actifsource.com |
| Trademark | Actifsource is a registered trademark of Actifsource AG in Switzerland, the EU, USA, and China. other names appearing on the site may be trademarks of their respective owners. |
Learn how to specify an actifsource Builtin
Install the feature and use builtin
ch.actifsource.tutorial.builtin with some resources.


MANIFEST.MF to open the manifest editor

src-gen folder to the source build when exporting a plugin including source code. This is not a requirement to export
the actifsource model as builtin however we want to get rid of this warning

ch.actifsource.core in the textbox to start filtering

If you do the conversion on an existing project, you may need to add additional dependencies. You might see this by looking into the generated files, the actifsource project dependencies and the java build path.
When exporting a model as plugin, you have to make sure that you have a plugin dependency to all required projects. This means all required projects need to be converted into plugins.

ch.actifsource.en to start filtering


Select the empty (ResourceFolder) entry
Enter the project relative path asrc to the resource folder
You may define different resource folders as defined in your actifsource project configuration. This is useful if you want to write templates inside your plugin to generated code and don’t want to deliver the template and related resources. Just put the templates in a separate resourcefolder which is not registered in the extension.

asrc Folder in the binary buildasrc in the binary release, if you fail to do so the plugin won’t contain any resources.

ch.actifsource.tutorial.builtin


EXAMPLE_BUILTIN

ch.actifsource.tutorial.builtinch.actifsource.environment in the plugin providing the resourcefolder.


ch.actifsource.builtin.feature for the feature

ch.actifsource.tutorial.builtin


ch.actifsource


ch.actifsource.tutorial.builtin.feature

actifsource.tutorial.categoryTutorial Category

ch.actifsource.tutorial.builtin.feature

feature.xml


category.xml


$HOME\updateSite


file:/c:/tmp/updateSitech.actifsource.


ch.actifsource.tutorial.builtin.usage

![]()
| Tutorial | Actifsource Tutorial – Java List Functions |
|---|---|
| Required Time | - 20 Minutes |
| Prerequisites | - Actifsource Tutorial – Installing Actifsource - Actifsource Tutorial – Simple Service - Actifsource Tutorial – Complex Service |
| Goal | - Learn about JavaListFunctions - Create your own JavaListFunction to sort resources |
| Topics covered | - JavaListFunction |
| Notation | ↪ To do ⓘ Information • Bold: Terms from actifsource or other technologies and tools • Bold underlined: actifsource Resources • Monospaced: User input• Italics: Important terms in current situation |
| Disclaimer | The authors do not accept any liability arising out of the application or use of any information or equipment described herein. The information contained within this document is by its very nature incomplete. Therefore the authors accept no responsibility for the precise accuracy of the documentation contained herein. It should be used rather as a guide and starting point. |
| Contact | Actifsource AG Täfernstrasse 37 5405 Baden-Dättwil Switzerland www.actifsource.com |
| Trademark | Actifsource is a registered trademark of Actifsource AG in Switzerland, the EU, USA, and China. other names appearing on the site may be trademarks of their respective owners. |
Let’s create a simple model for a club with its members with a resource which represents the date of birth
Let’s write a JavaListFunction which can sort members by their date of birth and use it in a template

Create some html output for the club members sorted by the date of birth (month and day)


Create a simple design consist of a club, containing members having a date of birth
Club is a NamedResource
Club owns 1..N Member
Member is a Resource
Member contains the following Attributes of type StringLiteral:
Member owns 1*1 DateOfBirth
DateOfBirth is a Resource
DateOfBirth contains the following Attributes of type IntegerLiteral:
The attributes for the individual classes can be displayed in the Class Diagram Editor by selecting the Show Attributes option the context menu (right mouse button on the class).


Note that this step is not necessary for sorting

Note that this step is not necessary for sorting


src-gen will contain a Java file named the same as your FunctionSpace

Since the memberList passed by Actifsource is marked final we have to copy the list in order to modify\
ArrayList<T> memberListSorted = new ArrayList<>(memberList);Return the copied list to get rid of compile errors\
return memberListSorted;


Collections.sort() from the Java collection framework allows us to pass a so called ComparatorComparator<T> as shown aboveComparator.compare shall return 0 if objects are equal, -1 if o1 is a predecessor of o2, or +1 if o1 is a successor of o2
Share project using your favorite VCS (Version Control System). Learn how to use the Local History and resolve conflicts. more…
Creating Eclipse Projects automatically using actifsource. more…
Learn how to use the GraphvizBuildTask to generate diagrams from generated DOT files using Graphviz. more…
Learn how to customize domain diagrams to your specific need using a diagram type. more…
Developing an easy to use state machine model. Show possible events in every transition. Restrict transition target to state instances of the own state machine. more…
Learn how transform code snippets into your target language. more…
Create UML State Machines with states, superstates, history states, (entry, exit, state) actions and transition guards more…
Learn how to document your own Meta Model and to generate a browsable HTML documentation. more…
![]()
| Tutorial | Actifsource Tutorial – Team Support |
|---|---|
| Required Time | - 20 Minutes |
| Prerequisites | - Actifsource Tutorial – Actifsource Tutorial – Installing Actifsource - Actifsource Tutorial – Simple Service |
| Goal | - Compare actifsource Resources using the Local History - Edit Conflicts using the actifsource Resource Compare Editor |
| Topics covered | - Setup VCS (Version Control System) - Install Eclipse Team Provider - Share Project - Local History - Edit Conflicts |
| Notation | ↪ To do ⓘ Information • Bold: Terms from actifsource or other technologies and tools • Bold underlined: actifsource Resources • Monospaced: User input• Italics: Important terms in current situation |
| Disclaimer | The authors do not accept any liability arising out of the application or use of any information or equipment described herein. The information contained within this document is by its very nature incomplete. Therefore the authors accept no responsibility for the precise accuracy of the documentation contained herein. It should be used rather as a guide and starting point. |
| Contact | Actifsource AG Täfernstrasse 37 5405 Baden-Dättwil Switzerland www.actifsource.com |
| Trademark | Actifsource is a registered trademark of Actifsource AG in Switzerland, the EU, USA, and China. other names appearing on the site may be trademarks of their respective owners. |
Setup your VCS (Version Control System)
Install an Eclipse Team Provider
Share your project using the Eclipse Team Support
Compare actifsource Resources using the Local History

Edit Conflicts using the actifsource Resource Compare Editor

Prepare a new actifsource Project as seen in the Actifsource Tutorial Simple Service
srcUse any package structure. For Example

To share a project you have to setup a VCS (Version Control System) first
You may choose one of the following
To enable the Eclipse Team Support, you have to install an Eclipse Team Provider
If you are using SVN, you may choose one of the following
The Eclipse Team Support comes all ready with the default installation of Eclipse.


Note that the Local History works also on non-shared projects


![]()
| Tutorial | Actifsource Tutorial – Project Generator |
|---|---|
| Required Time | - 30 Minutes |
| Prerequisites | - Actifsource Tutorial – Installing Actifsource - Actifsource Tutorial – Simple Service |
| Goal | - Generate Eclipse Projects using actifsource |
| Topics covered | - Create a project to generate eclipse projects - Generate the project settings - Create and distribute non-generated files - Generate .projectconfig files to enable project creation |
| Notation | ↪ To do ⓘ Information • Bold: Terms from actifsource or other technologies and tools • Bold underlined: actifsource Resources • Monospaced: User input• Italics: Important terms in current situation |
| Disclaimer | The authors do not accept any liability arising out of the application or use of any information or equipment described herein. The information contained within this document is by its very nature incomplete. Therefore the authors accept no responsibility for the precise accuracy of the documentation contained herein. It should be used rather as a guide and starting point. |
| Contact | Actifsource AG Täfernstrasse 37 5405 Baden-Dättwil Switzerland www.actifsource.com |
| Trademark | Actifsource is a registered trademark of Actifsource AG in Switzerland, the EU, USA, and China. other names appearing on the site may be trademarks of their respective owners. |
Create an eclipse project generator project
Generate the project settings

Place non-generated files

Generate .projectconfig files to enable project creation


Prepare a new actifsource Project as seen in the Actifsource Tutorial Simple Service
src

ch.actifsource.tutorial.project.generator.spec using the New Resource Wizard

.project file or copy it from one of your existing eclipse project.
.asproject and the .classpath file of a preconfigured project into it or use the ones on the following page.


.project, .classpath and .asproject, you need to generate a .projectconfig file.
Write a template for the .projectconfig file, as before use the projectname from the model.
Actifsource provides the following elements inside the project-element.


ch.actifsource.tutorial.project.generator.usage.

ch.actifsource.tutorial.project.generator.usage named “TestProject”.

actifsourcesrc-folderch.actifsource.tutorial.project.generator.usage
![]()
| Tutorial | Actifsource Tutorial – Diagram with Graphviz |
|---|---|
| Required Time | - 60 Minutes |
| Prerequisites | - Actifsource Tutorial – Installing Actifsource - Actifsource Tutorial – Simple Service |
| Goal | - Write a template to generate a UML Class Diagram as Graphviz DOT file - Generate a SVG graphic using GraphvizBuildTask |
| Topics covered | - Setup Graphviz - Create an UML model - Create a graph template for Graphviz - Add Visibility to Methods and Attributes - Distinguish Association types |
| Notation | ↪ To do ⓘ Information • Bold: Terms from actifsource or other technologies and tools • Bold underlined: actifsource Resources • Monospaced: User input• Italics: Important terms in current situation |
| Disclaimer | The authors do not accept any liability arising out of the application or use of any information or equipment described herein. The information contained within this document is by its very nature incomplete. Therefore the authors accept no responsibility for the precise accuracy of the documentation contained herein. It should be used rather as a guide and starting point. |
| Contact | Actifsource AG Täfernstrasse 37 5405 Baden-Dättwil Switzerland www.actifsource.com |
| Trademark | Actifsource is a registered trademark of Actifsource AG in Switzerland, the EU, USA, and China. other names appearing on the site may be trademarks of their respective owners. |

Before you can generate UML diagram, you need a running environment of Graphviz. If you already have the Graphviz commands working from command line (with the PATH environment variable set), you can skip the following setup and proceed with the actifsource Project settings.
Graphviz is an open source graph visualization software. Previously developed by AT&T it is now available under Eclipse Public Licence.
Start your internet browser and open the address www.graphviz.org.
Goto “Download” and check the licence agreement (Eclipse Public Licence).
Select the executable package provided for your operating system, download the current release and run it.
Follow the steps of the installation routine.
Add the “bin” folder of the installation path (e.g. C:\\Program Files\\Graphviz\\bin) to your PATH environment variable.
Prepare a new actifsource Project named ch.actifsource.tutorial.graphviz as seen in the Actifsource Tutorial Simple Service


actifsource Settings.

You don’t have to model the UML features explicitly in your real project – but you must be aware how to read those features out of your model. To avoid code duplication, Functions as in the Actifsource Tutorial Complex Service might help.


ch.actifsource.tutorial.graphviz.specific that shows the features we want to look at.


Note that the GraphvizBuildTask has to be executed after all DOT Files have been generated. Therefore it is always the last BuildTask in the list. If you add new **Template**s to the BuildConfig, move the GraphvizBuildTask to the end (by pressing Alt+PgDn).

If you are interested in the full capabilities of Graphviz, consult the documentation on www.graphviz.org.
Open the ClassDiagram Template with the Template Editor.
Create a directed graph (digraph) with the following attributes:
Place nothing in it but a single cluster, that will be drawn with a frame around
The main elements of a DOT file are graph, node and edge.
The default values of the attributes can be set with special statements:
Set the default attributes for Class Set its node shape to record and set fill color to lightyellow.
Set the default attributes for the extends Relation: The arrow should point from bottom to top (dir=back) and have an empty arrow head.
Set the default attributes for the Association The arrow head should have a V-shape (vee).

ch.actifsource.tutorial.graphviz.generic.Class and not ch.actifsource.core.Class


In the template, insert a new Column Context in the Context which iterates over all Method
Select in this Context the Method.visibility
In this context Insert Visibility.umlSymbol
Repeat the 3 steps for Attribute.visibility
You can eliminate the empty record fields in the class nodes of the graph by checking if there are any methods or attributes:


Add a Line Context that selects the Association Cardinality
In this Context, add a headlabel, that contains the min and max Cardinality:

Add a Line Context
In the Selector, cast Association to Aggregation and Composition respectively. The Line Contexts will be entered then only if it os an Aggregation or Composition
Set the arrowhead attribute to diamond and to ediamond (=empty diamond).

![]()
| Tutorial | Actifsource Tutorial – Domain Diagram Type |
|---|---|
| Required Time | - 30 Minutes |
| Prerequisites | - Actifsource Tutorial – Installing Actifsource - Actifsource Tutorial – Simple Service - Actifsource Tutorial – Statemachine |
| Goal | - Define Diagram Types to create and edit domain models in a graphical editor |
| Topics covered | - Create a user defined diagram type to display and edit domain specific diagrams - Create a domain diagram based on the diagram type to edit the underlying root resource - Define a highlight path from node to node over any edge - Define a tooltip for elements on the domain diagram |
| Notation | ↪ To do ⓘ Information • Bold: Terms from actifsource or other technologies and tools • Bold underlined: actifsource Resources • Monospaced: User input• Italics: Important terms in current situation |
| Disclaimer | The authors do not accept any liability arising out of the application or use of any information or equipment described herein. The information contained within this document is by its very nature incomplete. Therefore the authors accept no responsibility for the precise accuracy of the documentation contained herein. It should be used rather as a guide and starting point. |
| Contact | Actifsource AG Täfernstrasse 37 5405 Baden-Dättwil Switzerland www.actifsource.com |
| Trademark | Actifsource is a registered trademark of Actifsource AG in Switzerland, the EU, USA, and China. other names appearing on the site may be trademarks of their respective owners. |


The Root Class defines the Resource which contains the elements that shall be managed on your domain diagram
Select Statemachine as Root Class

The Allowed Class defines all the Resources which shall be managed on your domain diagram
Select State as Allowed Class since we want to design a state machine

Allowed Classes might be created using the domain diagram editor via a Palette Tool
Select the PaletteEntry ShowPaletteEntry or ShowRenamedPaletteEntry

Allowed Relations are relations that shall be displayed on the domain diagram
We like to see a transition from state to state just as a simple arrow
Define the Selector State.transition.targetState for the Indirect Relation
Define openEditor as false if you do not want to open the Resource Editor automatically after creating the transition via domain diagram editor.
Note that the resource Transition is displayed as an arrow


Note that the palette entry is influenced by DiagramType.allowedClass.paletteEntry

Note that the dependent Statemachine Statemachine1 is modified accordingly


Note that Transitions are based on Events by using the Decorating Relation


State.nameTransition.event.nameTransition.targetState.name


![]()
| Tutorial | Actifsource Tutorial – Domain Diagram Type 2 |
|---|---|
| Required Time | - 70 Minutes |
| Prerequisites | - Actifsource Tutorial – Installing Actifsource - Actifsource Tutorial – Simple Service - Actifsource Tutorial – Domain Diagram Typ |
| Goal | - Define Diagram Types to create and edit domain models in a graphical editor |
| Topics covered | - Create a Diagram Type - Working with Diagram Editor - Define shapes, figures and ports to use in Diagram Editor - Add conditions to figures - Add a search function to a domain diagram - Add notes to domain diagrams - Add labels to ports - Insert links in Domain Diagrams to (external) diagrams (e.g. UML State Machines) |
| Notation | ↪ To do ⓘ Information • Bold: Terms from actifsource or other technologies and tools • Bold underlined: actifsource Resources • Monospaced: User input• Italics: Important terms in current situation |
| Disclaimer | The authors do not accept any liability arising out of the application or use of any information or equipment described herein. The information contained within this document is by its very nature incomplete. Therefore the authors accept no responsibility for the precise accuracy of the documentation contained herein. It should be used rather as a guide and starting point. |
| Contact | Actifsource AG Täfernstrasse 37 5405 Baden-Dättwil Switzerland www.actifsource.com |
| Trademark | Actifsource is a registered trademark of Actifsource AG in Switzerland, the EU, USA, and China. other names appearing on the site may be trademarks of their respective owners. |

Define the properties of the Domain Diagram such that names of processes can be edited, ports can be created and out-ports (Port_Out) can be connected to in-ports (Port_In).
Add a search function that allows you to search for specific processes in a Domain Diagram
Add links to (existing) state diagrams to Domain Diagrams, e.g., to associate an UML state machines with a specific process to describe its behavior
ch.actifsource.tutorial.diagramm.ports as seen in the Actifsource Tutorial Simple Service

Create a ClassDiagram named Design in the Package generic using the DiagramEditor
Create the following Classes

Insert an Composition between
System and Process
Process and Port_In
Process and Port_Out
Insert a Association between
Adjust the Cardinalities as shown above

Create a new Resource of type System in the package ch.actifsource.tutorial.diagramm.ports.specific (Right-click on the package and choose New->Resource from the menu)
Give the name SystemA to the the newly created resource in the New Resource Wizard

We create a new Diagram Type called System in order to define properties of Domain Diagrams of Systems:
ch.actifsource.tutorial.diagramm.ports.generic and choose New -> Diagram Type
from the menu

Enter SystemDiagram as name for the newly created DiagramType in the New DiagramType Wizard
Make sure that ch.actifsource.tutorial.diagramm.ports.generic.System has (automatically) been chosen as RootClass

We create a new Domain Diagram for the resource SystemA
Select the resource SystemA and choose New ->Domain Diagram from the menu
Enter SystemA as the name of the new diagram in the New Domain Diagram Wizard
Click Finish

Next, we create a shape and a figure for the class Process in order to define how elements of type Process are displayed and handled in the Diagram Editor:
Open SystemDiagram in the Resource Editor
Create a statement allowedClass refering to an AllowedClass with class ch.actifsource.tutorial.diagramm.ports.generic.Process
As paletteEntry choose the type ShowPaletteEntry


Choose ProcessShape as name of the new ModelShape
Create a statement figure that refers to a new ch.actifsource.ui.diagram.figure.CompactFigure

Choose ProcessFigure as name of the new CompactFigure
Create a new drawElement and choose the type DrawRectangle from the Type Selection dialog
Define a fillColor by choosing DarkGray with the help of the Content Assist
Create a position (x=0, y=0) and a size (width = 100%, height=100%) statement as shown above
Note that the conventions for drawing graphic elements follows in general the conventions used in Java native libraries (e.g. Java AWT). This means that (x=0,y=0) is positioned in the upper left hand corner. The grid is then numbered in a positive direction on the x-axis (horizontally to the right) and in a positive direction on the y-axis (vertically going down).

We define a childContainer for the ProcessShape

We define the label of a process shape to be the name of the corresponding Process choose the initialization properties of a process shape and define a minimum size of process shapes:

We create two Process instances, ProcessA and ProcessB in the Domain Diagram Editor:

Check and inspect the newly created resources:
Note that the name in the resource editor is immediately updated when editing the label.

Next, we define a shape and figure for Port_Ins:
PortInShape to the new resource


Note that 0° is positioned at the 3 o'clock position and positive values indicate a counter-clockwise rotation, negative values a clockwise rotation.


PortOutShape to the newly created ModelShape.


We define the position of ports relative to their process shapes and their behavior:
Create a MovablePortShape in the ProcessShape
Define an anchorPoint with x=20% and y=0%
Define a movableRange with a position with x=0% and y=0% and a size with width=100% and height=100% (meaning that a port can be moved to any point on the boundary of the rectangular process shape)
We do not define an orientation (the shape of a port is thus rotated when moved along the boundary of its parent shape)

We define a selector for all the allowed Port figures:

Next, we a PortIn and PortOut to each of our two Processes:


Finally, we want to be able to connect outgoing ports Port_Out to ingoing ports Por_In by the relation Port_Out.port_In

We connect out_a with in_b as follows:


Next, we want the Process shape to change its color when its parts are hidden:


We add a search function to our Domain Diagrams that allows us to search for all Processes


Note that the process selected in the search function has been colored (blue).

Finally, we want to display the name of a port as label in the Domain Diagram Editor:


First, we make all (built-in) resources needed to build UML diagrams available in our project:
ch.actifsource.tutorial.diagramm.ports and choose Properties from the menu

We create a ch.actifsource.solution.uml.statediagram.generic.simple.Statemachine called ProcessA_State_Machine as described in Actifsource Tutorial – UML Statemachine in the package ch.actifsource.tutorial.diagramm.ports.specific.

We add a reference to an UML state machine (that describes the behavior of the Process) to Process


We define an action that is triggered by double-clicking on a process shape in our Domain Diagram and opens the UML state machine associated with the corresponding Process

![]()
| Tutorial | Actifsource Tutorial – Code Snippet |
|---|---|
| Required Time | - 120 Minutes |
| Prerequisites | - Actifsource Tutorial – Installing Actifsource - Actifsource Tutorial – Simple Service - Actifsource Tutorial – State Machine |
| Goal | - Add conditional expression to a transition - Add code as an action to a transition which will be executed together with the transition |
| Topics covered | - Code Snippet Editor - Code templates to generate code from code snippets |
| Notation | ↪ To do ⓘ Information • Bold: Terms from actifsource or other technologies and tools • Bold underlined: actifsource Resources • Monospaced: User input• Italics: Important terms in current situation |
| Disclaimer | The authors do not accept any liability arising out of the application or use of any information or equipment described herein. The information contained within this document is by its very nature incomplete. Therefore the authors accept no responsibility for the precise accuracy of the documentation contained herein. It should be used rather as a guide and starting point. |
| Contact | Actifsource AG Täfernstrasse 37 5405 Baden-Dättwil Switzerland www.actifsource.com |
| Trademark | Actifsource is a registered trademark of Actifsource AG in Switzerland, the EU, USA, and China. other names appearing on the site may be trademarks of their respective owners. |


Setup a project ch.actifsource.tutorial.statemachine.code with a meta-model for Statemachine create two instances of Statemachine and implement a code template for Statemachine as seen in the Actifsource Tutorial State Machine:
ch.actifsource.tutorial.statemachine.code

First, we import all the resources needed to enable the support of Code Snippets in our project:
ch.actifsource.tutorial.statemachine.code and choose Project->Properties from the main menu


We add a Code Snippet relation to class Transition:


We add a new Composition called variable to the class Statemachine:
ch.actifsource.core.Class as the range with the support of the Content Assist

Variable as name of the newly created class, which is opened automatically in the Resource Editor

A conditional expression for a Transition should be able to use all Variables that are owned by the Statemachine of the Transition as variables:
ch.actifsource.codesnippet.metamodel.TokenType.Variable as tokenType

We add a condition to the state transition triggered by the event start that restricts the number of times the Statemachine can switch to the State Started


We add a conditional expression to the state transition triggered by the Event start in the State Initialized

We enforce that the Statemachine can only switch a maximum of startLimit times to the State Started by adding the same conditional expression also to the Transition triggered by the Event start in the State Stopped

We create a new Diagram Type called Statemachine in order to define properties of Domain Diagrams of Statemachines:
ch.actifsource.tutorial.statemachine.code.generic and choose New -> Diagram Type


Now we create a new Domain Diagram for Statemachine1 based on the newly created Diagram Type:
ch.actifsource.tutorial.statemachine.code.specific and choose New -> Domain Diagram


Next, we will see how to display the conditional expressions associated with a Transition in the Domain Diagram. First, we create a function that generates the displayed text from the conditional expression:
ch.actifsource.tutorial.statemachine.code.generic and choose New -> FunctionSpace


The function should display the name of the event triggering the Transition and in brackets the conditional expression if there is one:

CodeSnippet.displayCodeSnippetSingleLine@DisplayCodeSnippet in the column context. This function outputs a string that represents the expression in the Code Snippet as entered by the user, i.e., without parsing or processing it

We will use the newly created function displayName to define a NameAspect for Transitions

Transition.displayName@NameFunction as selector of the NameAspect, i.e., the name of the Transition will be the output of the function we have defined before


In this part, we will extend the template StatemachineImpl as implemented in the Actifsource Tutorial State Machine such that the statemachine executes a state transition only if the associated condition is fulfilled:

We write an if-statement with the conditional expression associated with a Transition as condition:

toC@CodeSnippetToCode on the CodeSnippet available in the this context as condition of the if-statement

Statemachine1Impl.hpp (overwritten) and Statemachine2Impl.hpp (unchanged) and inspect the changes.


ch.actifsource.tutorial.statemachine.code and choose New -> Source Folder from the menu


ch.actifsource.tutorial.statemachine.code.generic in the aspects folder: select the aspects folder and choose New -> Package from the menu

ch.actifsource.tutorial.statemachine.code.generic in the folder aspects and choose New -> Interface from the menuIMyNameProvider as name of the new interfacech.actifsource.codesnippet.metamodel.template.INameProvider as Extended interface

ch.actifsource.tutorial.statemachine.code.generic in the folder aspects and choose New -> Class from the menuMyNameProviderLiteralAspect as name of the new classch.actifsource.core.model.aspects.impl.AbstractStatelessAspectImpl as Superclassch.actifsource.core.model.aspects.impl.IGenericLiteralAspect<IMyNameProvider> as Interfacepackage ch.actifsource.tutorial.statemachine.code.generic;
import javax.annotation.CheckForNull;
import ch.actifsource.core.INode;
import ch.actifsource.core.Literal;
import ch.actifsource.core.job.IReadJobExecutor;
import ch.actifsource.core.model.aspects.impl.AbstractStatelessAspectImpl;
import ch.actifsource.core.model.aspects.impl.IGenericLiteralAspect;
import ch.actifsource.core.scope.IResourceScope;
public class MyNameProviderLiteralAspect extends AbstractStatelessAspectImpl implements IGenericLiteralAspect<IMyNameProvider> {
@Override
public boolean allowMultiline() {
return false;
}
@Override
public @CheckForNull String isValid(IReadJobExecutor executor, IResourceScope scope,
String value) {
return null;
}
@Override
public Literal create(IMyNameProvider value) {
return new Literal(value.toString());
}
@Override
public @CheckForNull String getJavaConstructionExpression(IReadJobExecutor executor,
IResourceScope scope, INode node) {
return null;
}
@Override
public @CheckForNull IMyNameProvider getValue(IReadJobExecutor executor,
IResourceScope scope, INode node) {
return null;
}
@Override
public Class<IMyNameProvider> getValueType() {
return IMyNameProvider.class;
}
}return MyNameProvider.class; in the method getValueType()return new Literal(value.toString());

ch.actifsource.tutorial.statemachine.code.generic in the folder asrc and choose New -> Resource from the menuMyNameProviderLiteral as Name of the new Resource

ch.actifsource.tutorial.statemachine.code.generic.MyNameProviderLiteralAspect as classNamech.actifsource.codesnippet.metamodel.parsetree.template.NameProvider, which is the default NameProvider and generates names by calling simpleName@BuiltIn

ch.actifsource.tutorial.statemachine.code.generic in the asrc folder and choose New -> FunctionSpace


m_Resource.simpleName@BuiltIn as text, i.e., the function appends the prefix m_ to the output of Resource.simpleName@Builtin


generateNameProvider as name of the function

    @Override
    public ch.actifsource.tutorial.statemachine.code.generic.IMyNameProvider generateNameProvider(final ch.actifsource.tutorial.statemachine.code.generic.javamodel.IStatemachine statemachine) {
      /* Begin Protected Region [[835774eb-ee6c-11ef-8f29-099ac721970d]] */
      return new IMyNameProvider() {};
      /* End Protected Region   [[835774eb-ee6c-11ef-8f29-099ac721970d]] */
}return new IMyNameProvider(){} inside the protected region in the method body of the method generateNameProvider


Statemachine.generateNameProvider@TokenNameFunctions:NameProvider as selector of the new contextCodeSnippet.toCwithNameProvider@CodeSnippetToCodeNote that there is an error on the edited line because the parameter to the function cannot be resolved

Insert a new line context on the same line and choose CodeSnippet:CodeSnippet (This dummy context allows Actifsource to correctly and automatically resolve the parameter to the function from the contexts)
Save the template and make sure that the code is generated


In this part, we will see how to add an action to a transition. We add the code corresponding to the action as a Code Snippet to the model. This code will be executed together with the transition:

We will now increment the startCounter each time that we switch to the State Started:

toCwithNameProvider@CodeSnippetToCode on the CodeSnippet in the new line contextNote that there is an inconsistency because we have not yet added a NameProvider to our contexts which can be used as the parameter to the function


![]()
| Tutorial | Actifsource Tutorial – UML Statemachine |
|---|---|
| Required Time | - 70 Minutes |
| Prerequisites | - Actifsource Tutorial – Installing Actifsource - Actifsource Tutorial – Simple Service - Actifsource Tutorial – Domain Diagram Typ - Actifsource Tutorial – Domain Diagram Type II |
| Goal | - Create UML State Machines using the built-in Actifsource solution |
| Topics covered | - Create UML State Machines with states, superstates, history states, (entry, exit, state) actions and transition guards |
| Notation | ↪ To do ⓘ Information • Bold: Terms from actifsource or other technologies and tools • Bold underlined: actifsource Resources • Monospaced: User input• Italics: Important terms in current situation |
| Disclaimer | The authors do not accept any liability arising out of the application or use of any information or equipment described herein. The information contained within this document is by its very nature incomplete. Therefore the authors accept no responsibility for the precise accuracy of the documentation contained herein. It should be used rather as a guide and starting point. |
| Contact | Actifsource AG Täfernstrasse 37 5405 Baden-Dättwil Switzerland www.actifsource.com |
| Trademark | Actifsource is a registered trademark of Actifsource AG in Switzerland, the EU, USA, and China. other names appearing on the site may be trademarks of their respective owners. |


Create a new Actifsource project with the name ch.actifsource.tutorial.umlstatemachine
Change to the tab Built-in Dependencies in the New Actifsource Project dialog
Add the built-in dependency UML (which makes all resource needed to build and represent UML state machines available in our new project).
Close both dialogs by clicking OK and Finish

Create a new resource of type ch.actifsource.solution.uml.statediagram.generic.simple.Statemachine
Enter CoinMachineStateMachine as the name of the new resource


First, we create two superstates, called NormalMode and DiagnosticMode:
Select SuperState from the Palette and left-click in the Diagram Editor to create a superstate
Enter NormalMode as the name of the new SuperState in the New Resource Wizard
In the same way, create a SuperState called DiagnosticMode
Select Start from the palette and right-click in the Diagram Editor to create a start state (i.e., the default or initial state of the state machine)
In the Select mode, you can now re-size and re-position the states as usual in the Diagram Editor


Now, we create nested states to define the behavior in the NormalMode
Select State from the Palette and left-click in the lower section of the NormalMode state to create a nested state in the superstate NormalMode
Enter the name Locked as name of the State in the New Resource Wizard
In the same way create the two nested states Locked and Empty in the NormalMode and the two nested states TestLock and TestCoin in the superstate DiagnosticMode

Select Start from the Palette and left-click in the lower section of the NormalMode state (see above) to create a default or start state
As before, select Relation from the Palette and create a relation from the start state to the state Locked
In the same way, create a start state in the DiagnosticMode and create a relation from this start state to the state TestLock

Next, we define the state transitions and events:
Select Relation from the Palette and create a relation from the state Locked to the state Unlocked
With Control+Click on the GUID of the newly created relation, you can now open the transition in the Resource Editor

In the Resource Editor, create a new Event for the transition from state Locked to Unlocked
Give the name Coin to the newly created event

Switch to the open StateDiagram_1 in the Diagram Editor and check that the transition from Locked to Unlocked is now labeled 'Coin'
In the same way, create the following transition and events: Unlocked Empty Empty TestCoin TestLock

We want to create a condition that is only true if the machine is non-empty. Thereto, we introduce a variable stockItems that keeps track of the number of items left in the machine:
INTEGER as field

Next, we add guards to transitions such that the corresponding transitions only fire if the guard evaluates to TRUE:

Note that the Boolean expression stockItems > 0 is now displayed to represent the condition of the guard


Next, we add actions that are executed together with transitions and introduce shared functions which can be used as actions by multiple transitions:

Add a transitionFunction of type ManualFunctionImpl to the transition Locked (see above)
In the same way create the following transitionFunctions of type ManualFunctionImpl:


When the event Refilled occurs, the variable stockItems (i.e, the private variable that counts the number of stock items) should be set to the initial numbers of items:

Each time the machine is unlocked, the number of stock items should be decremented by one:


We add a transition that is triggered by an event Diagnose from the NormalMode to the DiagnosticMode (i.e., a technician should be able to switch to this diagnose state from any state in the normal mode). To save the state of the machine before switching modes, we introduce a history state:

Since the state of the DiagnosticMode is not saved before returning to the NormalMode, the light should be switched off when entering the diagnostic mode:

Finally, we want to generate code that implements the specified UML state machine:
ch.actifsource.tutorial.umlstatemachine in the Project Explorer and select Properties from the menu

Statemachine_CoinMachineStateMachine.c and Statemachine_CoinMachineStateMachine.h have been generated and inspect the generated code

![]()
| Tutorial | Actifsource Tutorial – Meta Model Documentation |
|---|---|
| Required Time | - 20 Minutes |
| Prerequisites | - Actifsource Tutorial – Installing Actifsource - Actifsource Tutorial – Simple Service |
| Goal | - Learn how to document your own Meta Model - Generating browsable HTML documentation |
| Topics covered | - Meta Model Documentation Builtin model |
| Notation | ↪ To do ⓘ Information • Bold: Terms from actifsource or other technologies and tools • Bold underlined: actifsource Resources • Monospaced: User input• Italics: Important terms in current situation |
| Disclaimer | The authors do not accept any liability arising out of the application or use of any information or equipment described herein. The information contained within this document is by its very nature incomplete. Therefore the authors accept no responsibility for the precise accuracy of the documentation contained herein. It should be used rather as a guide and starting point. |
| Contact | Actifsource AG Täfernstrasse 37 5405 Baden-Dättwil Switzerland www.actifsource.com |
| Trademark | Actifsource is a registered trademark of Actifsource AG in Switzerland, the EU, USA, and China. other names appearing on the site may be trademarks of their respective owners. |

ch.actifsource.tutorial.metamodel.docu


docu


Create a new resource named Service Documentation of type Documentation


docu
Design a simple state machine where you can switch on a lamp while switching off will be delayed. more…
Design a simple state machine that allows you to switch on a lamp, while switching it off is delayed. This tutorial is intended for users of the old CIP application. more…
Learn how to specify a CIP Test Suite model and how to run unit tests on your CIP state machine. more…
Learn how to download and run the generated C code from your CIP machine on the Arduino platform. more…
![]()
| Tutorial | Actifsource Tutorial – CIP Statemachine - Lamp |
|---|---|
| Required Time | - 60 Minutes |
| Prerequisites | - Actifsource Tutorial – Actifsource Tutorial – Installing Actifsource -Actifsource Tutorial – Simple Service |
| Goal | - Creating a state machine using the CIP method - Generating real time C code for any embedded system |
| Topics covered | - Setting up a new CIP Project - Communicating with the Outer World - Specify the State Machine - Generating State Machine Code |
| Notation | ↪ To do ⓘ Information • Bold: Terms from actifsource or other technologies and tools • Bold underlined: actifsource Resources • Monospaced: User input• Italics: Important terms in current situation |
| Disclaimer | The authors do not accept any liability arising out of the application or use of any information or equipment described herein. The information contained within this document is by its very nature incomplete. Therefore the authors accept no responsibility for the precise accuracy of the documentation contained herein. It should be used rather as a guide and starting point. |
| Contact | Actifsource AG Täfernstrasse 37 5405 Baden-Dättwil Switzerland www.actifsource.com |
| Trademark | Actifsource is a registered trademark of Actifsource AG in Switzerland, the EU, USA, and China. other names appearing on the site may be trademarks of their respective owners. |
Learn how to specify a simple state machine
Example
CIP Method
The CIP System is the root element
The CIP System consists of Clusters
The CIP Cluster consists of Processes
The CIP Process consists of Modes

Prepare a new Actifsource/CIP Project using the Actifsource CIP wizard
Click Next

ch.actifsource.tutorial.cip.lamp


Note that the BuildConfigs in TargetFolder are equivalent to the previously selected project type

Open the Communication Diagram (if not already open)

Button and Lamp using the Channel tool from the Palette

Select the Button in the diagram with selected Properties tool from the palette
Arrange the Graphical Editor and the Properties View together on the same screen as shown above
Add the two ChannelMessages Push and Release to the Channel Button
Push and ChannelMessage ReleaseAdd the two ChannelMessages Bright and Dark to the Channel Lamp
Bright and ChannelMessage DarkMessages are given as function calls from the other world to the state machine and vice versa

The CIP Method specifies that every physical process needs a logical counterpart in the model
Button and Lamp to the Cluster LampClusterNote that different Clusters may run on different processors. This allows you to design distributed state machines using the CIP Method.

Channels are Delivering Messages to a Process via Port. Doing so allows you to consider the Process to a self-consistent component.
ButtonPort and a relation from the Channel Button to the Port ButtonPortLampPort and a relation from the Port LampPort to the Channel Lamp

Since every Process is a self-consistent component we have to specify a Message interface on the port to. The = Tool in the Message Translation helps us to create the same messages as found on the Channel also on the corresponding Port.
Configure the Message Translation between the Channel Button and the Process Button
Configure the Message Translation between the Process Lamp and the Channel Lamp
Note that the CIP Method knows so called Modes
Making this difference it becomes possible to provide several Modes for several situations
There are the following rules


Released and Pushed using the PaletteState are shared for every mode


Add the input message to Transition from State Released to State Pushed
Add the input message to Transition from State Pushed to State Released
Note that you now selecting the Messages that we have previously created on the Port Button using the = Tool in the Message Translation

Add the Outpulse On to Transition from State Released to State Pushed
Select Edit Tool from the Palette
Klick on the italics label Outpulse
Enter the desired Outpulse named On and press Ctrl-Space
Add the Outpulse Off to Transition from State Pushed to State Released

Set the Init-State to specify the State to start with


Configure the Pulse Cast between the Process Button and the Process Lamp


Open the StateDiagram for Process Lamp (if not already done)
Create States Dark Bright and Delayed
Make State Dark the Init-State
Create Transition as shown above

Start Timer in Transition #2

3 ticksThe DelayText shall return the delay in system ticks
Stop Timer in Transition #3 (Optional)

LampImplementation

LampUnit as shown above

cip-gen
![]()
| Tutorial | Actifsource Tutorial – CIP Statemachine - Lamp |
|---|---|
| Required Time | - 60 Minutes |
| Prerequisites | - Actifsource Tutorial – Actifsource Tutorial – Installing Actifsource -Actifsource Tutorial – Simple Service |
| Goal | - Creating a state machine using the CIP method - Generating real time C code for any embedded system |
| Topics covered | - Setting up a new CIP Project - Communicating with the Outer World - Specify the State Machine - Generating State Machine Code |
| Notation | ↪ To do ⓘ Information • Bold: Terms from actifsource or other technologies and tools • Bold underlined: actifsource Resources • Monospaced: User input• Italics: Important terms in current situation |
| Disclaimer | The authors do not accept any liability arising out of the application or use of any information or equipment described herein. The information contained within this document is by its very nature incomplete. Therefore the authors accept no responsibility for the precise accuracy of the documentation contained herein. It should be used rather as a guide and starting point. |
| Contact | Actifsource AG Täfernstrasse 37 5405 Baden-Dättwil Switzerland www.actifsource.com |
| Trademark | Actifsource is a registered trademark of Actifsource AG in Switzerland, the EU, USA, and China. other names appearing on the site may be trademarks of their respective owners. |
Learn how to specify a simple state machine
Example
CIP Method
The CIP System is the root element
The CIP System consists of Clusters
The CIP Cluster consists of Processes
The CIP Process consists of Modes

Prepare a new Actifsource/CIP Project using the Actifsource CIP wizard
Click Next


Note that the BuildConfigs in TargetFolder are equivalent to the previously selected project type


Open CIP System View


Open the Communication Diagram (if not already open)


Arrange the Graphical Editor and the Resource Editor together on the same screen as shown above
Add the two ChannelMessages Push and Release to the Channel Button
Add the two ChannelMessages Bright and Dark to the Channel Lamp
Messages are given as function calls from the other world to the state machine and vice versa

Note that different Clusters may run on different processors. This allows you to design distributed state machines using the CIP Method.


Since every Process is a self-consistent component we have to specify a Message interface on the port to. The = tool in the Message Translation helps us to create the same messages as found on the Channel also on the corresponding Port.
Configure the Message Translation between the Channel Button and the Process Button
Configure the Message Translation between the Process Lamp and the Channel Lamp
We are now set to specify the state machines for each process
Note that the CIP Method knows so called Modes
Making this difference it becomes possible to provide several Modes for several situations
There are the following rules

Open the StateDiagram for Process Button


Note that the Actifsource Validator marks all resources that are incomplete
Add the input message to Transition from State Released to State Pushed
Add the input message to Transition from State Pushed to State Released
Note that you now selecting the Messages that we have previously created on the Port Button using the =-Tool in the Message Translation

Use Messages to communicate with Processes from the outer world
Use Pulses to communicate between Processes within the same Cluster
Add the Outpulse On to Transition from State Released to State Pushed
Ctrl-Klick on the italics label Outpulse
Enter the desired Outpulse named On and press Ctrl-Space
Add the Outpulse Off to Transition from State Pushed to State Released

Set the Init-State to specify the State to start with

Use Pulses to communicate between Processes within the same Cluster
The PulseCastDiagram specifies which Processes sends Pulses to which other Processes
Open the PulseCastDiagram for Cluster Lamp

Add the Process Button and the Process Lamp to your PulseCastDiagram
Connect the Process Button and the Process Lamp using the Relation Tool from the Palette
Configure the Pulse Cast between the Process Button and the Process Lamp


Open the StateDiagram for ProcessLamp (if not already done)
Create States Dark Bright and Delayed
Make State Dark the Init-State
Create Transition as shown above

Start Timer in Transition #2
Stop Timer in Transition #4


cip-gencip-gen
![]()
| Tutorial | Actifsource Tutorial – CIP Test Suite - Console |
|---|---|
| Required Time | - 30 Minutes |
| Prerequisites | - Actifsource Tutorial – Actifsource Tutorial – [Installing Actifsource]../../..(/tutorials/\10_community/10_install/index.html) -Actifsource Tutorial – Simple Service - Actifsource Tutorial – CIP Statemachine - Lamp |
| Goal | - Creating Unit Tests for a CIP Statemachine |
| Topics covered | - Setting up the code options - Setting up a CIP Test Suite - Generate the CIP Test Suite - Generate the CIP Test Suite Documentation |
| Notation | ↪ To do ⓘ Information • Bold: Terms from actifsource or other technologies and tools • Bold underlined: actifsource Resources • Monospaced: User input• Italics: Important terms in current situation |
| Disclaimer | The authors do not accept any liability arising out of the application or use of any information or equipment described herein. The information contained within this document is by its very nature incomplete. Therefore the authors accept no responsibility for the precise accuracy of the documentation contained herein. It should be used rather as a guide and starting point. |
| Contact | Actifsource AG Täfernstrasse 37 5405 Baden-Dättwil Switzerland www.actifsource.com |
| Trademark | Actifsource is a registered trademark of Actifsource AG in Switzerland, the EU, USA, and China. other names appearing on the site may be trademarks of their respective owners. |
Learn how to specify a CIPTestSuite model
Run the unit tests


Define the first test event of type MessageEvent
First define the event message which is sent to the CIP machine
Let’s switch on the light by pressing the button

Define the second test event of type MessageEvent
First define the event message which is sent to the CIP machine
Let’s activate the switch off delay by pressing the button
Since switching off is delayed, we do not expect the light to be switched off

Define the third test event of type TickEvent
Define the number of ticks to time up the delay
The light is expected to be switched off after 3 ticks
CDT (C/C++ Development Tool) and mingw or gcc for C language support


Select the command line options


Note that you can directly link back from the console output in the corresponding model by clicking on the blue GUID links


Test_CipSystem_TestSuite_Documentation.html is generated in your target folder


![]()
| Tutorial | Actifsource Tutorial – CIP Statemachine - Arduino |
|---|---|
| Required Time | - 120 Minutes |
| Prerequisites | - Actifsource Tutorial – Installing Actifsource - Actifsource Tutorial – Simple Service - Actifsource Tutorial – CIP Statemachine - Lamp |
| Goal | - Compiling and running the CIP Statemachine on the Arduino UNO |
| Topics covered | - Arduino SDK - Simple Arduino project - CIP Arduino project |
| Notation | ↪ To do ⓘ Information • Bold: Terms from actifsource or other technologies and tools • Bold underlined: actifsource Resources • Monospaced: User input• Italics: Important terms in current situation |
| Disclaimer | The authors do not accept any liability arising out of the application or use of any information or equipment described herein. The information contained within this document is by its very nature incomplete. Therefore the authors accept no responsibility for the precise accuracy of the documentation contained herein. It should be used rather as a guide and starting point. |
| Contact | Actifsource AG Täfernstrasse 37 5405 Baden-Dättwil Switzerland www.actifsource.com |
| Trademark | Actifsource is a registered trademark of Actifsource AG in Switzerland, the EU, USA, and China. other names appearing on the site may be trademarks of their respective owners. |
Arduino SDK
AVR Eclipse Plugin
Simple Arduino project
CIP Arduino project

Download your Arduino SDK from www.arduino.cc
Unzip the Arduino SDK on your hard disk
C:\arduino-1.0.3\ in this example

Plugin your Arduino to a USB port
Open the Device Manager from the Control Panel
Find the failed device
Install new driver
Search the driver on your computer
Specify C:\arduino-1.0.3\drivers as the place to look for the driver
C:\arduino-1.0.3\drivers\FTDI USB Drivers

Check if the driver has been installed correctly
Important: Remember the com port

Open the boards.txt file in C:\arduino-1.0.3\hardware\arduino
Print the information for your hardware platform
For Linux you can simply install gcc-avr avr-libc avrdude:
sudo apt-get install gcc-avr avr-libc avrdude

Start your Eclipse with a new workspace
In your Eclipse, click Help/Install new Software…
Add the AVR-Eclipse plugin update site avr-eclipse.sourceforge.net
Installing the plugin requires eclipse to restart

C:\arduino-1.0.3\hardware\tools\avr\bin or /usr/binC:\arduino-1.0.3\hardware\tools\avr\utils\\bin or /usr/binC:\arduino-1.0.3\hardware\tools\avr\avr\\include or /usr/lib/avr/includeC:\arduino-1.0.3\hardware\tools\avr\bin or /usr/bin

Create a new C++ Project
You have to create a C++ project even if you plan to write C code since we have to compile the Arduino Core
If you can’t create a C/C++ Project you have probably not downloaded the Eclipse for C/C++ Developers

ch.actifsource.tutorial.cip.arduino

Do not create a Debug Version
The debug code is too large to fit on the Arduino Uno
See boards.txt for the maximum code size
Click Fish
Open the C/C++ Perspective if you are asked or open it manually in the upper right corner


ch.actifsource.tutorial.cip.arduino, choose Properties (Mouse-Click-Right on the project)-p atmega328p -c arduino -P/dev/ttyUSB0 -b 11520016000000atmega328p

16000000atmega328p


This step is only needed on Windows
SimpleProject/Properties/C/C++Build/Settings/AVR Compiler/Directories
Set Include Path C:\arduino-1.0.3\hardware\tools\avr\avr\include
Set Include Path C:\arduino-1.0.3\hardware\arduino\cores\arduino
Set Include Path C:\arduino-1.0.3\hardware\arduino\variants\standard
Click OK

Do the same again for SimpleProject/Properties/C/C++Build/Settings/AVR C++ Compiler/Directories
Set Include Path C:\arduino-1.0.3\hardware\tools\avr\avr\include
Set Include Path C:\arduino-1.0.3\hardware\arduino\cores\arduino
Set Include Path C:\arduino-1.0.3\hardware\arduino\variants\standard
Click OK

src in the project

main.c in the folder src#include <avr/io.h>
#include <util/delay.h>
#define DELAYTIME 500 // 500ms Verzögerung
int main(void)
{
DDRB |= _BV(DDB5); // Setze Pin PB5 (Arduino LED) als Ausgang
while (1) {
PORTB |= _BV(PORTB5); // LED einschalten
_delay_ms(DELAYTIME); // Wartezeit
PORTB &= ~_BV(PORTB5); // LED ausschalten
_delay_ms(DELAYTIME); // Wartezeit
}
return 0; // Dieser Punkt wird nie erreicht
}main.c as shown above
Your code is probably not linking if you named your file main.cpp instead if main.c

Mount your LED between Pin 13 and GND
The program starts automatically after the download has been completed


ch.actifsource.tutorial.cip.arduino in the Project Explorer

Properties/actifsource/Resource Pathsasrc

Properties/actifsource/Built-in Dependencies

Properties/actifsource/Target Folderssrc as target foldersrc

asrc in the Project Explorer

ch.actifsource.tutorial.cip.arduino as NamespaceLampSystem as Name


src#include <avr/io.h>
#include <util/delay.h>
#include "sLampUnit.h"
#define LED_PIN PB5 // LED connected to PB5 (Arduino Pin 13)
#define BUTTON_PIN PB4 // Button connected to PB4 (Arduino Pin 12)
void AI_LampUnit_C2_Dark() {
PORTB &= ~_BV(LED_PIN); // Turn LED OFF
}
void AI_LampUnit_C2_Bright() {
PORTB |= _BV(LED_PIN); // Turn LED ON
}
void iMSG_LampUnit() {
OUT_LampUnit.C2_Dark = AI_LampUnit_C2_Dark;
OUT_LampUnit.C2_Bright = AI_LampUnit_C2_Bright;
}
int main(void)
{
if (!fINIT_LampUnit()) {return 1;} // init cip
// Set LED_PIN as an output
DDRB |= _BV(LED_PIN);
// Set BUTTON_PIN as an input and enable internal pull-up resistor
DDRB &= ~_BV(BUTTON_PIN); // Configure as input
PORTB |= _BV(BUTTON_PIN); // Activate internal pull-up (idle state = HIGH)
int oldbuttonState = 0;
while (1) {
int newButtonState = PINB & _BV(BUTTON_PIN); // read button pin
TRG_LampUnit.TICK_();
// ticking time
if(oldbuttonState!=newButtonState && newButtonState==1) {
IN_LampUnit.C1_Push();
}
if(oldbuttonState!=newButtonState && newButtonState==0) {
IN_LampUnit.C1_Release();
}
oldbuttonState=newButtonState;
while (TRG_LampUnit.PENDING_.ANY_) {
TRG_LampUnit.STEP_();
}
delay_ms(4);
}
return 0; // Never reached
}main.c as shown aboveYour code is probably not linking if you named your file main.cpp instead if main.c

Download your code to the Arduino


We built a lamp with a delayed off switch
Start while Button is released
Press Button 🡪 Light should switch on
Release Button 🡪 Light should switch off with delay
delay_ms() call in the main.c
The glossary contains all relevant terms to understand the actifsoure documentation.
Click on the [+] indicators below to get a longer explanation for any particular term.